Last month, I decided it was time to get my hands dirty and jump right into learning some Ansible Automation with NetApp.
I bookmarked a link to a blog article that was posted on NetApp.io (The Pub) that guides you through installing Ansible, updating NetApp Modules, understanding Playbooks, creating your first playbook, and lastly a complete workflow example. The blog posts were written by one of NetApp’s Technical Marketing Engineers, David Blackwell.
The blog posts are well written, really easy to follow and within no time I had gone through the 5 sections and was ready to start creating my own Ansible Playbooks.
At the end of this blog post is my youtube video where I will walk you through the exact same steps and you can see that in 51 seconds, I was able to have an entire cluster setup and ready to serve NFS volumes to VMware vSphere.
For this demonstration, I have prepared my NetApp Simulator by erasing the whole system (option 4 on the boot menu). This leaves us at the Cluster Setup Wizard.
Basic NetApp Cluster Setup in preparation for Ansible
First up, we will quickly run through the NetApp Cluster Setup and then create an Ansible user account with appropriate access within Ontap.
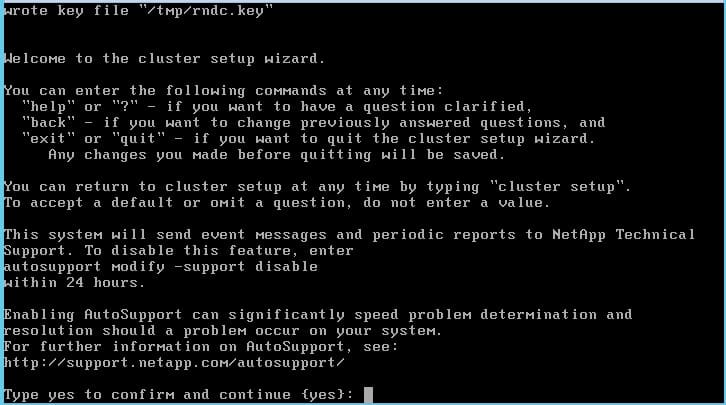
At the cluster setup wizard, the very first prompt is asking you to enable Autosupport. Type yes.
The NetApp simulator has 4 interfaces: e0a, e0b, e0c and e0d. The first 2 are used for the cluster interconnect. I’ll be making e0c my node management and cluster management port. Later on, we will be adding vlans to e0d to make sub-interfaces.
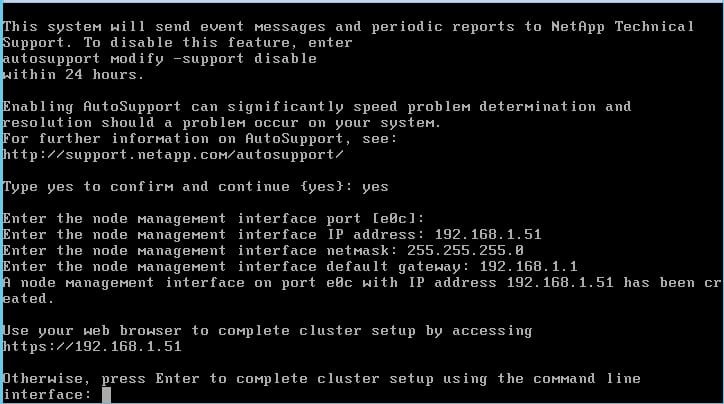
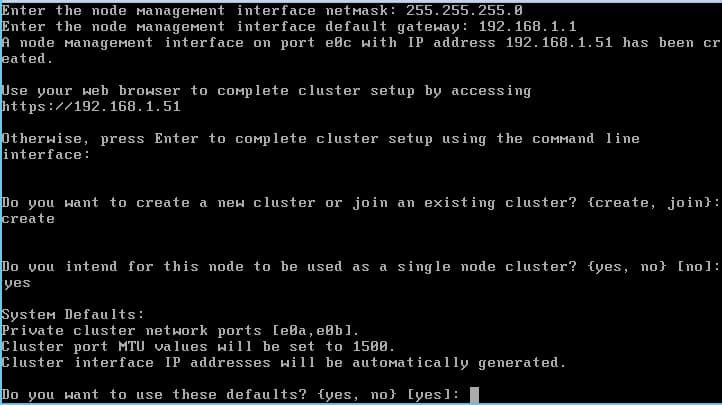
You can see in the screenshot below I have selected e0c as my node management port, entered an IP address of 192.168.1.51, subnet mask of 255.255.255.0 and default gateway of 192.168.1.1
Once you have entered in the basic network information you have the option to continue the cluster setup via the web gui or via CLI. In this demo I will press Enter and continue the setup via the CLI.
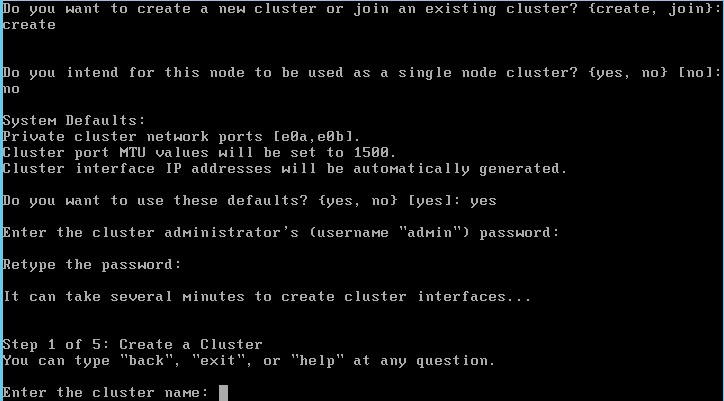
Next up, I’ll type in ‘create’ to create a new cluster and when it asks if you would like to use this node as a single node cluster, I will type yes.
When asked for the private cluster network ports, make sure you select e0a and e0b. Anything illustrated in square brackets, for example [e0a,e0b] means those are the default ports.
I type yes to accept the defaults.
Enter in a password for the admin account.
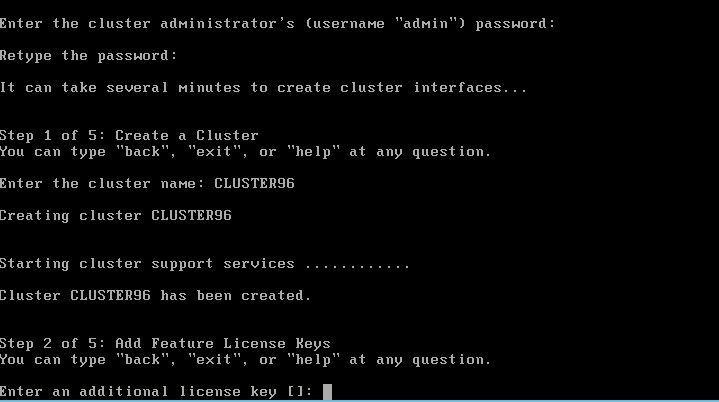
Type a name for the cluster. In this demo my cluster name is CLUSTER96 (96 stands for Ontap 9.6)
Don’t worry about adding in feature license keys as I will be using Ansible to enter in all the NetApp Simulator license keys. You can simply press enter here.
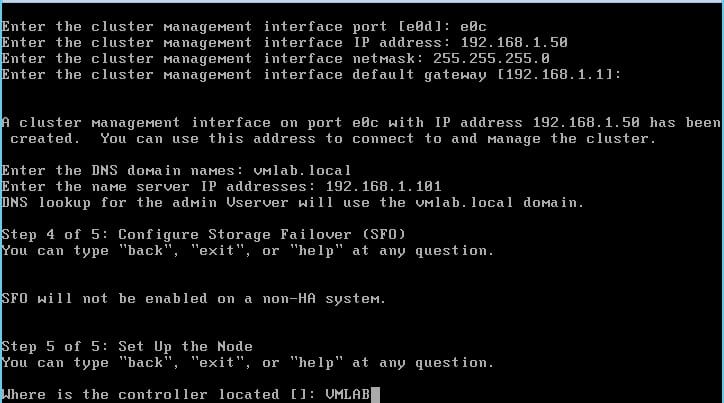
In the screenshot below, you can see that the simulator wanted to place the cluster management IP on e0d, however, I have specified that I want it on e0c. My cluster management IP address is 192.168.1.50, subnet mask is 255.255.255.0 and the default gateway is 192.168.1.1.
I will enter in the DNS domain name for my Windows Active Directory DNS Server which is vmlab.local
 +
+
The screen shot below shows that I entered in the DNS domain name of vmlab.local as well as the IP address to my DNS server. Which is 192.168.1.101.
For the question ‘Where is the controller located’, you can simply type anything. I have specified VMLAB.
Voila, with the above few simple steps, the basic NetApp setup is now complete. I can now browse to my Cluster IP with https and login to the Cluster.
Now that we have our NetApp cluster up and running, we can move onto creating our Ansible playbook.
Preparing to Create My first Ansible Playbook
My NetApp simulator is running Ontap 9.6. With the NetApp Cluster Wizard now complete, it was time to think about all the necessary configuration steps in order to prepare the system for a VMware vSphere environment consisting of NFS datastores.
This is what I came up with:
- Install NetApp Licenses
- Set NTP
- Set Timezone
- Rename the Root Aggregate
- Create and online a new Data Aggregate
- Create a Vserver
- Setup a VLAN
- Creating a Broadcast Domain
- Subnet Creation
- Create an NFS Lif
- Start NFS
- Create NFS Export Rule
- Add DNS Settings to Vserver
- Create first NFS Volume
- Create an additional NFS Volume
What Do I Need To Create My First NetApp Ansible Playbook
Ansible Playbooks are constructed using YAML (Yet Another Markup Language). Having very little experience with YAML I found it quite easy to get my head around how to construct one of this Ansible Playbook files. When I say easy, I mean it’s quite intuitive.
To be able to automate any system with Ansible, we need to use an Ansible module. For NetApp, there are plenty. You can find a list of storage modules here: https://docs.ansible.com/ansible/latest/modules/list_of_storage_modules.html
Basically what we want to do in order to start creating our playbook, is look for the module that fits our automation step. For example, in my list above, the first thing I want to do is install the NetApp simulator licenses. I browse the list of Ansible storage modules and click on na-ontap-module
Within the Ansbile NetApp Cluster module, it gives us a list of parameters to use in order to install a license. Underneath the parameters, it also gives you some examples. I then pick which parameters I want to use and construct part of my playbook.
Let’s Dive In And Create Out First Ansible Playbook
Let’s take a look at my first Ansible Playbook which was to install NetApp simulator licenses. Below is the exact code I used:
#########################################################################################################################################
# -= Requirements =-
#
# 1. Make sure ansible user has been created
# 1a. security login create -vserver CLUSTER96 -role admin -application http -authentication-method password -user-or-group-name ansible
# 1b. security login create -vserver CLUSTER96 -role admin -application ontapi -authentication-method password -user-or-group-name ansible
########################################################################################################################################## ---
- hosts: localhost name: NetApp licensing vars: login: &login hostname: 192.168.1.50 username: ansible password: Password123 https: true validate_certs: false clustername: CLUSTER96 tasks: - name: Install Licenses na_ontap_cluster: state: present cluster_name: "{{ clustername }}" license_code: "{{ item }}" <<: *login loop: - CAYHXPKBFDUFZGABGAAAAAAAAAAA - APTLYPKBFDUFZGABGAAAAAAAAAAA - WSKTAQKBFDUFZGABGAAAAAAAAAAA - CGVTEQKBFDUFZGABGAAAAAAAAAAA - OUVWXPKBFDUFZGABGAAAAAAAAAAA - QFATWPKBFDUFZGABGAAAAAAAAAAA - UHGXBQKBFDUFZGABGAAAAAAAAAAA - GCEMCQKBFDUFZGABGAAAAAAAAAAA - KYMEAQKBFDUFZGABGAAAAAAAAAAA - SWBBDQKBFDUFZGABGAAAAAAAAAAA - YDPPZPKBFDUFZGABGAAAAAAAAAAA - INIIBQKBFDUFZGABGAAAAAAAAAAA
If we break it down, anything with a # relates to a comment. As I didn’t want to use my NetApp admin credentials for my Ansible server, I documented the steps at the beginning of the file about how to create a specific Ansible user.
#########################################################################################################################################
# -= Requirements =-
#
# 1. Make sure ansible user has been created
# 1a. security login create -vserver CLUSTER96 -role admin -application http -authentication-method password -user-or-group-name ansible
# 1b. security login create -vserver CLUSTER96 -role admin -application ontapi -authentication-method password -user-or-group-name ansible
##########################################################################################################################################
Next, we always start a playbook with 3 dashes —
We then move onto specifying the host that runs Ansible, in this case it is my localhost.
Before moving onto variables and tasks, we give this playbook a name. In my instance I called this playbook NetApp Licensing
---
- hosts: localhost name: NetApp licensing
It’s now time to start constructing our variables to be used as part of the playbook.
We start our variables with the var: line and then list out all the variables we wish to use. You may be thinking that it’s unsafe to have the Ansible NetApp username and password contained within the file, and I 100% agree, but for a lab it’s fine. For production, you can encrypt the password into a password file.
I’m using a small trick that I learned from reading through David Blackwell’s blog post. Instead of specifying the hostname, username and password in every task, you simple use <<: *login, this relates to everything under login: &login below. You will see <<: *login being used in the next section when we move onto tasks.
vars: login: &login hostname: 192.168.1.50 username: ansible password: Password123 https: true validate_certs: false clustername: CLUSTER96
Tasks can consist of 1 or more actions. In this playbook, we only have the one task which is using the na_ontap_cluster module to install multiple licenses on a specific cluster.
The name of this task is ‘Install Licenses’
The Ansible module responsible for installing licenses to the cluster is called: na_ontap_cluster
When the state = present, it means that the license keys should exist, if they don’t exist install them.
The cluster_name parameter, is calling the clustername variable we created under our vars: section of the playbook file.
When I first created this playbook file, it didn’t look like this. I could only install 1 license key per task. Coming from a Powershell background, I wanted to use a loop. I spent some time researching how to do loops with Ansible and the following section got updated to install multiple license keys under the one task.
The parameter, license_code = item, refers to 1 line under the loop: section i.e. 1 license code. It then loops through each license checking to see if the license is installed on the system or not. If it is not installed, Ansible will go ahead and install it.
tasks:
- name: Install Licenses na_ontap_cluster: state: present cluster_name: "{{ clustername }}" license_code: "{{ item }}" <<: *login loop: - CAYHXPKBFDUFZGABGAAAAAAAAAAA - APTLYPKBFDUFZGABGAAAAAAAAAAA - WSKTAQKBFDUFZGABGAAAAAAAAAAA - CGVTEQKBFDUFZGABGAAAAAAAAAAA - OUVWXPKBFDUFZGABGAAAAAAAAAAA - QFATWPKBFDUFZGABGAAAAAAAAAAA - UHGXBQKBFDUFZGABGAAAAAAAAAAA - GCEMCQKBFDUFZGABGAAAAAAAAAAA - KYMEAQKBFDUFZGABGAAAAAAAAAAA - SWBBDQKBFDUFZGABGAAAAAAAAAAA - YDPPZPKBFDUFZGABGAAAAAAAAAAA - INIIBQKBFDUFZGABGAAAAAAAAAAA
Once I finished created this file I saved it as install_licenses.yml
To run the Ansible playbook, you simply type: ansible-playbook install_licenses.yml
Combining Multiple Tasks into One Ansible Playbook
The first bit was quite simple as I was only doing 1 task. Next I built an Ansible playbook for each of the following tasks:
- Set NTP
- Set Timezone
- Rename the Root Aggregate
- Create and online a new Data Aggregate
- Create a Vserver
- Setup a VLAN
- Creating a Broadcast Domain
- Subnet Creation
- Creating an NFS Lif
- Start NFS
- Create NFS Export Rule
- Add DNS Settings to Vserver
- Create first NFS Volume
- Create an additional NFS Volume
Following on from the multiple Ansible playbook files above it was time to combine all these tasks into 1 Ansbile playbook file. As a result, I then only need to execute 1 playbook.
I’m going to post this final code to my GitHub page which you can find by clicking here.
It’s a big file with lots of lines, don’t get scared. I’m hoping that after reading through David Blackwell’s blog above (Getting started with Ansible and NetApp), and reading through how I approached it, you will be able to understand the file, make changes and test it in your lab.
I have gone ahead and labeled all the variables within the YAML file so that you can easily identify which ones to change to suit your environment.
As an indication, to manually configure all the steps above can you take around 1-2 hours. Executing the Ansible playbook with 14 tasks, took me 51 seconds. You can see the live results of the playbook by viewing the video below.
If you have any questions in regards to any parts of the file, please leave a comment. If you’re an Ansible guru and have suggestions on how to make this playbook better, please also leave a comment.
Please take note that all of this testing was in my lab on the NetApp simulator.
Automating A NetApp Cluster Install in 51 Seconds with Ansible
The video below goes through what we spoke about in this blog, you will be able to see it live. With displaying a stopwatch, you can experience first hand how long it takes to setup a NetApp system using Ansible.
The post How To Automate NetApp Installations With Ansible appeared first on SYSADMINTUTORIALS IT TECHNOLOGY BLOG.