Setting up SSL on Multisite subdomains was complex and expensive…until now! WPMU DEV hosting with Free Wildcard SSL automatically included on all hosted sites solves this issue!
Oct 2020: We tested all the best WordPress hosts! Find out how we compare.View Results
One of the most powerful features of WordPress is that you can set up and manage multiple sites under one parent WordPress Multisite environment using subdomains. That’s Multisite in a nutshell.
Simple, huh?
Well…not quite.
You see, most legit sites today require SSL. SSLs are always bound to specific domains. So, to set up subdomains on Multisite, each with their own valid SSL certificate, you have to mess with a bunch of stuff like editing files and configuring different domain settings and DNS records or hand over fistfuls of dollars for custom SSL certificates.
If this just seems all too hard and difficult, we agree! So, we figured that, since we are the Multisite experts (our own Edublogs.org hosts over 4 million educational sites), we had to find an easier, simpler, and far less expensive way to set up sites with SSL on a Multisite environment.
Introducing…
Free Wildcard SSL on WPMU DEV Hosting
Before we explain the benefits of using Wildcard SSL and show you how to set up Multisite subdomains with it, let’s get something straight:
Most hosts don’t allow you to host multisite on their basic plans…and certainly not for less than US$10 per month.
With our WPMU DEV hosting, you get this for free!
Even better, Wildcard SSL is automatically set up and configured for you as soon as you turn the Multisite option on your site on (see the tutorial further below to see how easy setting up Multisite is!).
Also, because we offer free Wildcard SSL and massive SSD storage FOR EVERY SITE hosted with us, you get unlimited, compartmentalized hosting, each with access to Wildcard SSL, so if you plan to run several multisite installations using different domains, you can set up, umm..let’s see…loads of sites on unlimited subdomains, each with SSL fully enabled automatically.
Please be aware, however, that WordPress Multisite networks use more server, CPU, and memory resources than standard WordPress single installs. So, if you plan to have more than a handful of sites, you might need one of our higher plans to meet your WordPress Multisite network’s needs.
Ok, so now that we got you all excited about Free Wildcard SSL…
What is Wildcard SSL?
Let’s use Wikipedia’s definition…
“a wildcard certificate is a public key certificate that can be used with multiple subdomains of a domain. The principal use is for securing web sites with HTTPS, but there are also applications in many other fields. Compared with conventional certificates, a wildcard certificate can be cheaper and more convenient than a certificate for each subdomain. Multi-domain wildcard certificates further simplify the complexity and reduce costs by securing multiple domain and their subdomains.”
Source: Wikipedia
So, let’s say you want to set up the following sites on subdomains with SSL:
payment.example.comdirectory.example.comdevelopers.example.commembers.example.comlogin-secure.example.comwww.example.com
Instead of having to purchase and set up an SSL certificate for every subdomain listed above, you can use a single wildcard certificate that lets you add SSL to every subdomain automatically like this:
https://*.example.com
So that’s basically what a wildcard SSL does.
Now, I hear a bunch of you thinking the following questions aloud…
What about subdirectory Multisite?
Wildcard SSL also works for subdirectory (i.e. subfolder) Multisite installations, e.g.:
https://example.com/*
Note that if you want to use a subdirectory Multisite, Wildcard SSL is not required.
However, if you plan to set up a subdirectory Multisite and then map domains to it as subdomains (e.g. set up a subdirectory multisite like this: example.com/site1 and then map site1.example.com to it) you will need a Wildcard SSL for domain *.example.com.
That’s why we also allow Wildcard SSLs to be used on subdirectories.
What if I want to set up a number of WordPress Multisite environments, all using different domains?
Ahhh…the multi Multisite developer.
No problem! As mentioned earlier, if you choose to host your sites with WPMU DEV, each of your domains is set up on a fully compartmentalized hosting account with free Wildcard SSL already built-in and automatically configured for you.
All you have to do is click a few buttons and connect a few things, as shown in the tutorial below.
How to Set Up Multisite Subdomains with Wildcard SSL on WordPress with WPMU DEV Hosting
To set up https on Multisite subdomains, do the following:
1. Set up hosting for your domain
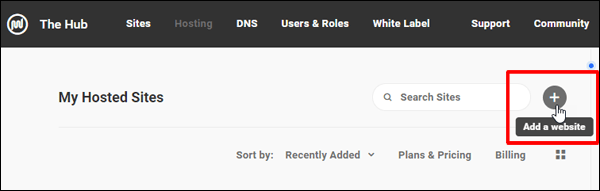
The first step is to create a new site in your hosting hub.
From The Hub, select Add a website.
Next, select the option to create a new site.
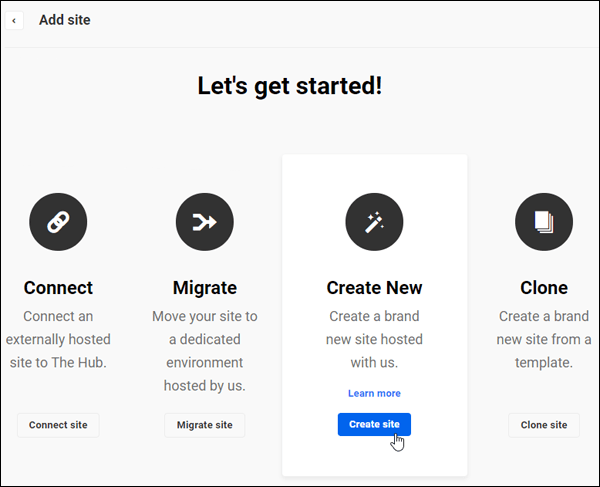
Go through the steps and complete the site creation process. If you need help creating a new site in your hosting hub, check out our documentation.
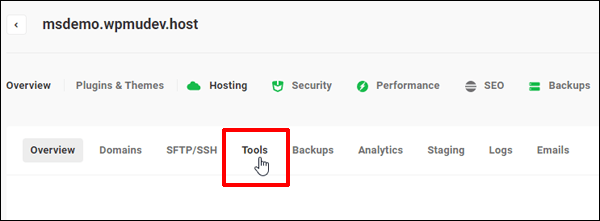
2. Convert to Subdomain Multisite
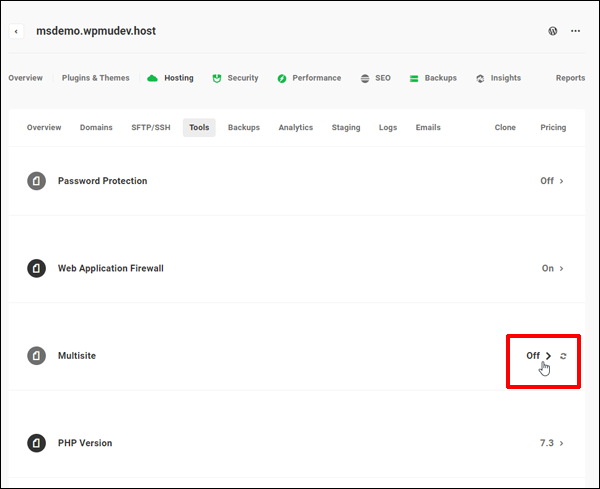
Once your new site has been created, click on the Tools tab in your hosting area and bring up the Tools screen.
Scroll down to Multisite and click on the ‘Off >’ link.
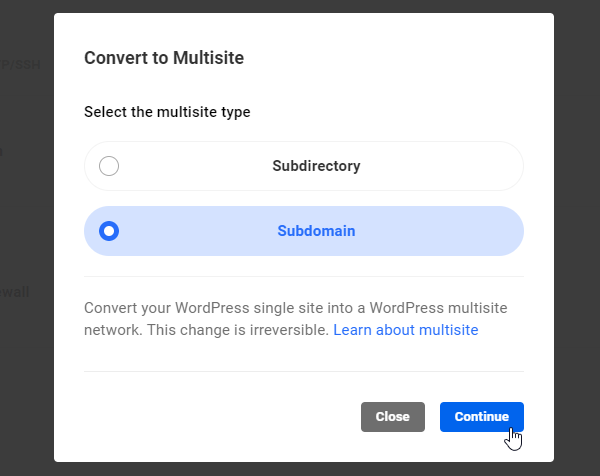
You have the option of converting your single WordPress site installation into a Multisite network using subdirectories or subdomains.
Choose Subdomain and click Continue.
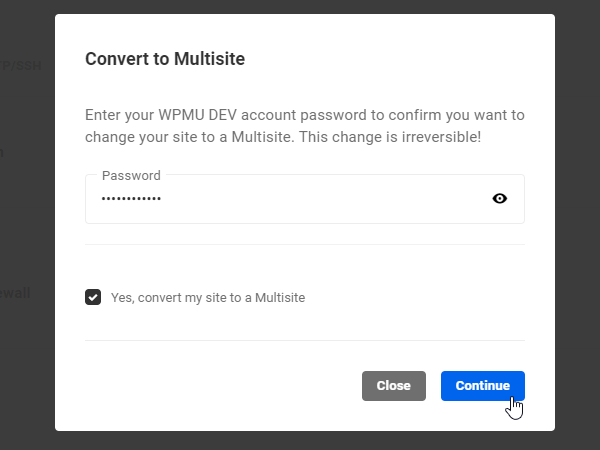
The last step is to confirm that you really want to convert your installation to Multisite by entering your account password. As pointed out, once you change your site Multisite, the change is irreversible. (Tip: if this is a brand new install and you didn’t want to set up Multisite on your domain, just delete your installation and start again!).
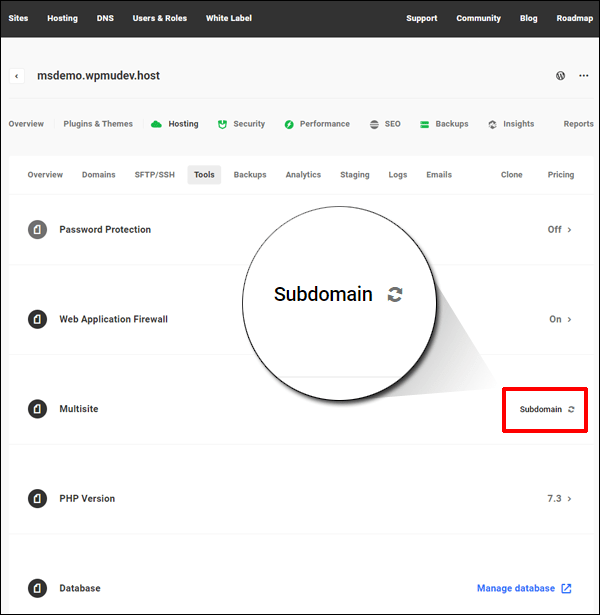
Congratulations! Your site is now a Multisite with subdomains.
3. Update Your Nameservers
Now that your Multisite environment is all set up, the next step is to point your domain to nameservers and set up your DNS records (<- check this post if you need help).
Note: There’s no need to point your domain to our nameservers. The CNAME record we provide for our wildcard SSL can be used on any registrar as it’s a normal DNS entry.
For this tutorial, I’ve set up a free domain name at Freenom (you can use any domain you like from your preferred domain registrar).
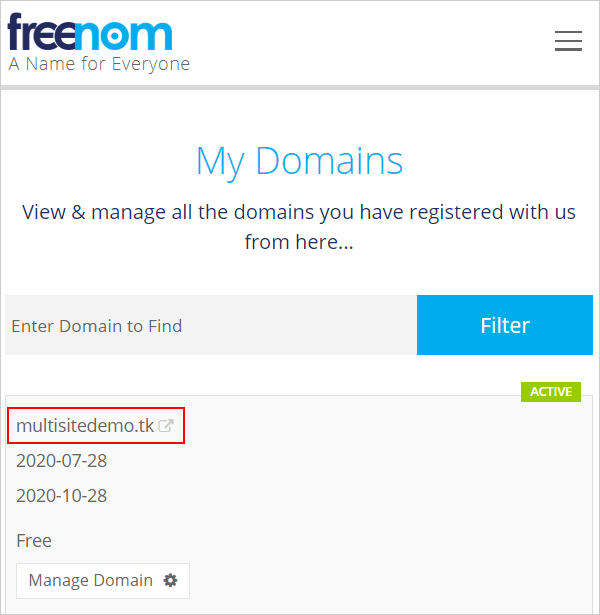
Once you have your domain name, the next step is to:
- Add the domain to our DNS Manager, and
- Obtain your name server records
If you need help learning how to add a domain to our DNS Manager, see this tutorial.
Note: You don’t need to use our DNS Manager, your DNS can be hosted anywhere you like, but you do have to use a service that allows you to use wildcard DNS records because not all DNS services support this (hint: we support it!)
Once your domain has been added to the DNS Manager, the following DNS records will display for pointing your domain to our nameservers.
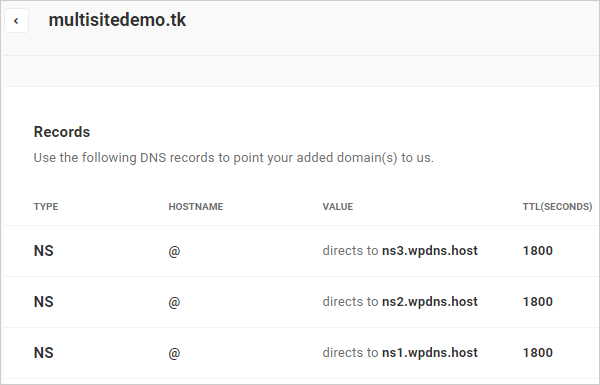
Make a note of these records or select and copy a record to your clipboard.
Next, go to your domain registrar and update their nameserver records, as shown below.
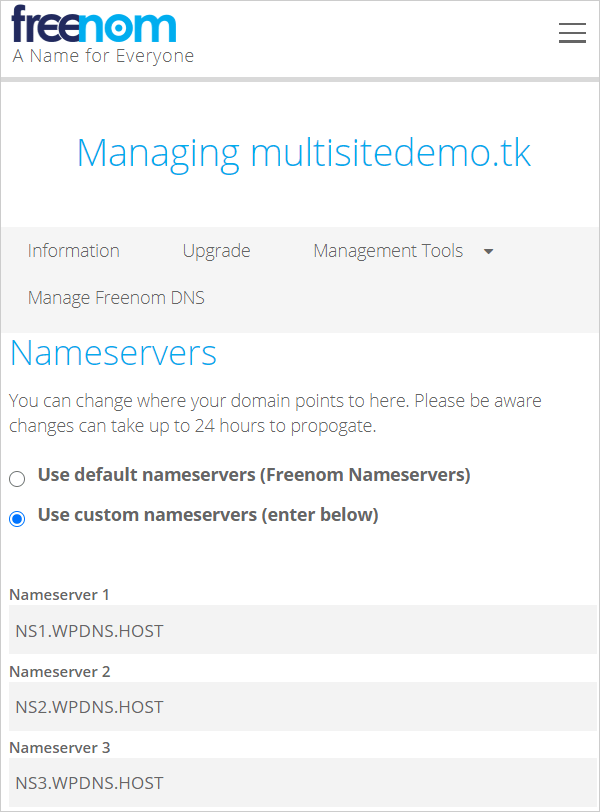
If you need help, check our documentation. We provide guidance and links to the DNS documentation of several popular registrars.
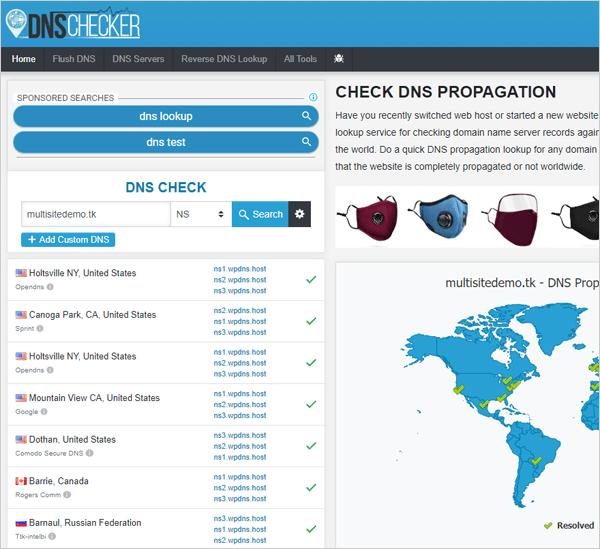
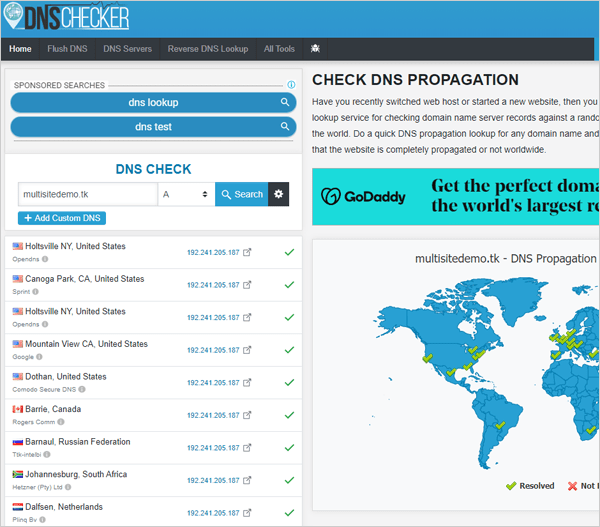
After updating your nameserver records, wait a little bit for these to propagate. You can use a tool like DNSChecker or WhatsMyDNS to check when your changes have propagated.
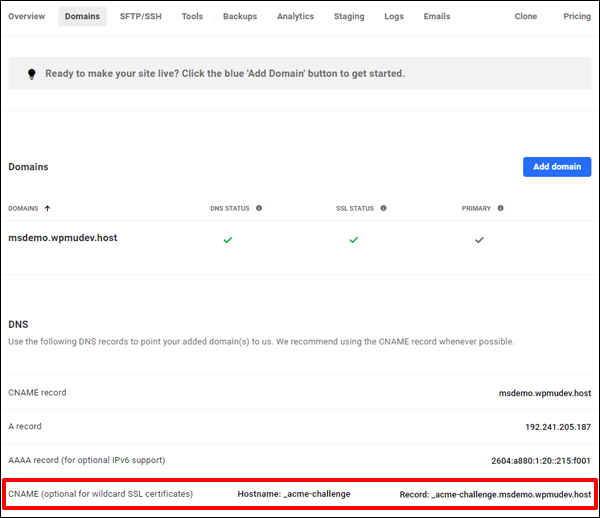
4. Grab the Wildcard SSL DNS record
To use wildcard SSL, you will need to add a new CNAME entry to your DNS records.
To obtain this record, go to the Domains tab in your hosting hub and scroll down to the bottom of the screen.
You will see a new DNS record named _acme-challenge.yourdomain. Click on these details and copy these records to your clipboard.
5. Add DNS record and propagate
The next step depends on whether:
- WPMU DEV manages the DNS for your domain, or
- Another service manages the DNS for your domain
If WPMU DEV manages your domain DNS:
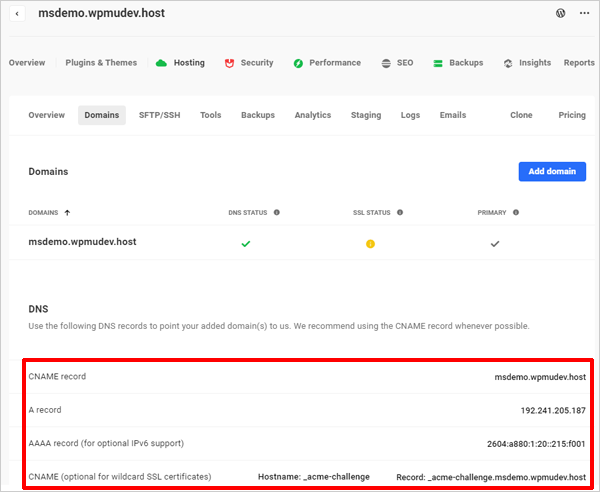
Go to The Hub, then select your temporary domain name and click on Hosting > Domains.
This brings up a screen with the DNS settings you will need to add to the DNS Manager for your domain name to work correctly.
Tip: We recommend copying and pasting these records into a plain text file, as you will need them in the next step.
Next, go to The Hub and click on DNS.
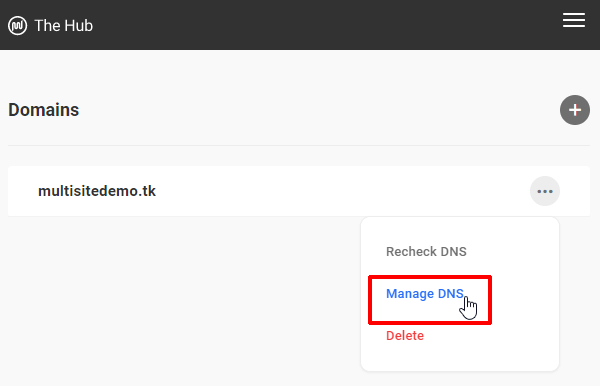
If you followed step 3 above, your domain name should already have been added to the DNS Manager.
Click on the three dots next to your domain to bring up the options menu and select Manage DNS.
Click the Add button and select CNAME Record.
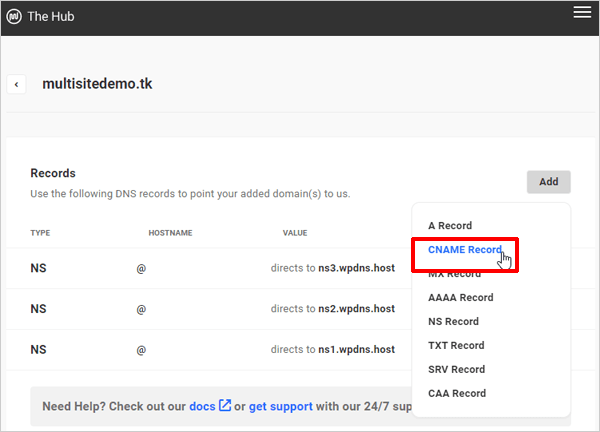
Enter the wildcard details provided in point 4 into the fields as shown below, then click on the Add button.
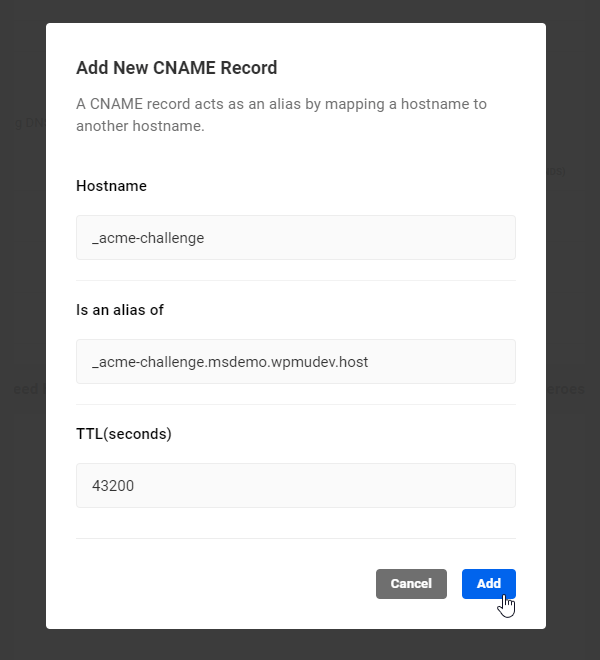
Your CNAME record will be added to your domain’s DNS records.
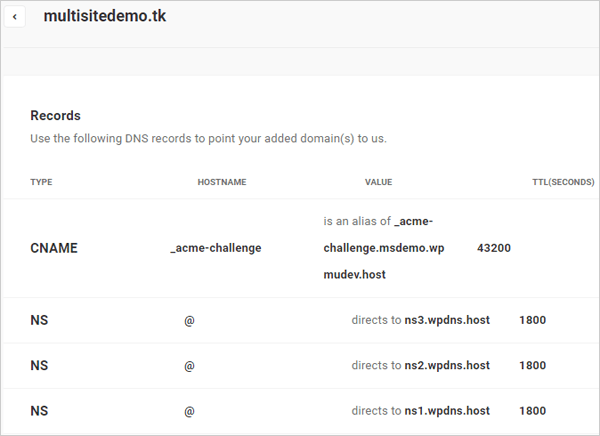
Now, go back to The Hub > Hosting > Domains screen (or refer to your plain text file with the pasted records) and add the A, AAAA, and CNAME records to the DNS Manager.
Your DNS records should look like the screenshot below:
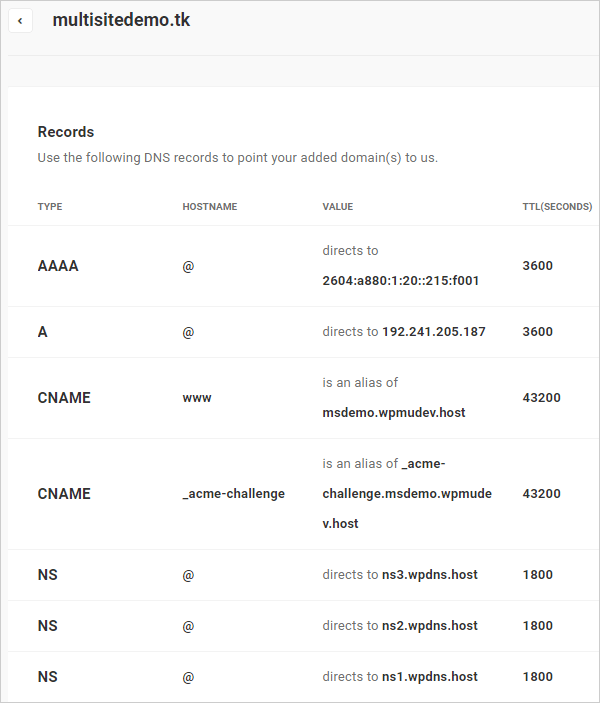
Make sure all of the details in this section are correct, otherwise your domain will not propagate correctly.
If another service manages your domain DNS:
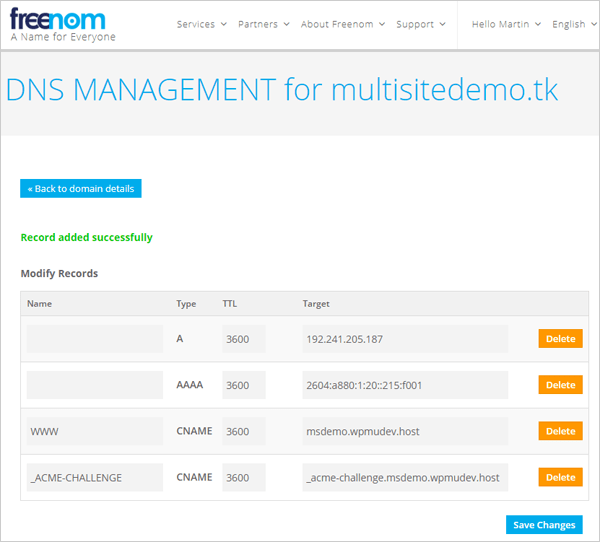
If another service provider is managing the DNS for your domain (and they support using wildcard DNS records), then make sure you enter all of your DNS record details correctly, including the CNAME for your wildcard SSL.
Again, if you need help updating your registrar’s DNS records, see our documentation for links to setup guides for the most popular registrars.
After updating your DNS records with the new CNAME entry, wait a little bit for the DNS to propagate (check propagation using a tool like DNSChecker or WhatsMyDNS).
6. Add your Domain to our Hosting
Now that we’ve taken care of nameservers and DNS, let’s add your domain name to our hosting.
In The Hub, click on your temporary domain to access your account settings, then click on Hosting > Domains.
In the Domains screen, click on Add domain.
Enter your domain name (and add the optional ‘www’ too if you like), then click on the blue ‘Add domain’ button.
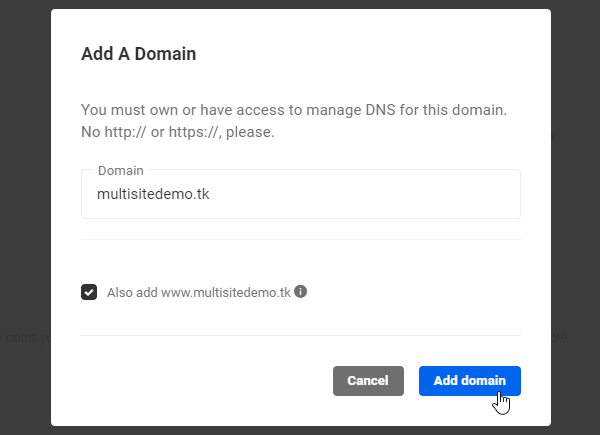
Your domain name will be added to your hosting account settings.
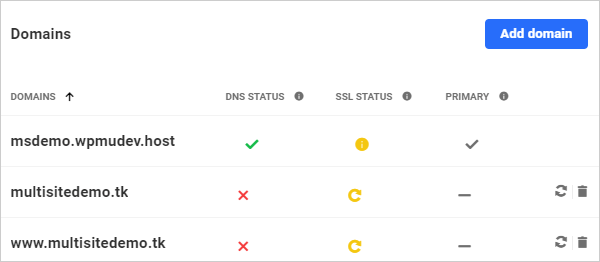
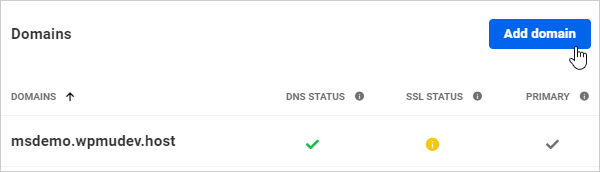
Once domain records fully propagate (you may need to wait 24-48 hours), the Domains screen normally shows green ticks next to all domain entries.
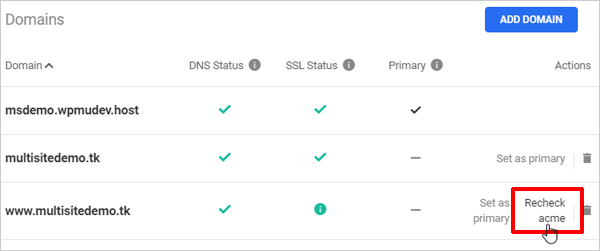
However, if you have set up the domain for Multisite with subdomains, you will see an “info” icon, reminding you to confirm your wildcard SSL certificate.
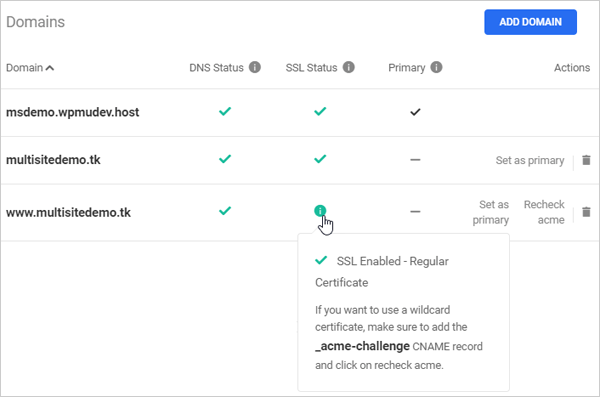
To do this, simply click the recheck acme button to reissue the certificate…
Your subdomain multisite should show SSL as being secured by a Wildcard Certificate.
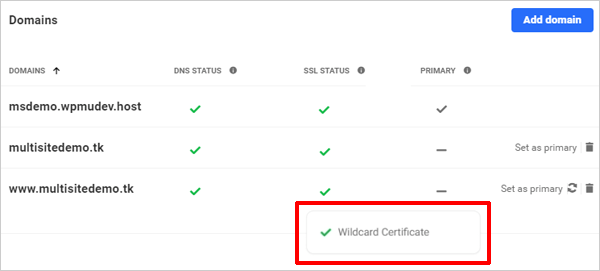
Finally, set your primary domain in the Primary column and confirm that wildcard SSL is enabled in the SSL Status column.
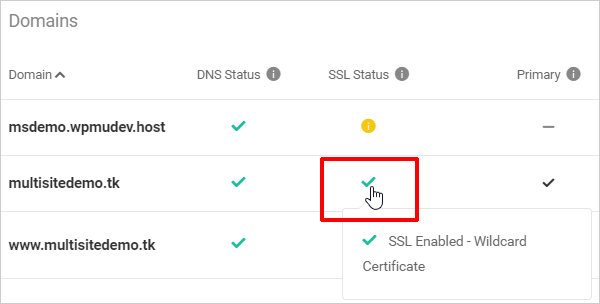
Any subsite you load in your subdomain multisite will now be secured using the same wildcard SSL certificate.
You’re all done!
You can check that wildcard SSL has been installed, set up, and configured correctly on your server via your web browser or using a tool like SSL Checker.
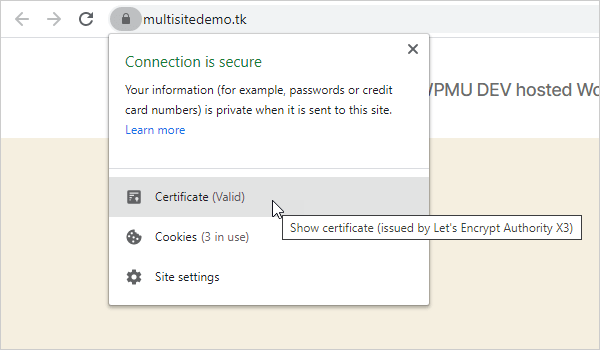
To check whether wildcard SSL is installed correctly and valid via your web browser, load your site in your browser, click on the HTTPS icon (secure padlock) next to your URL, and select ‘Certificate’.
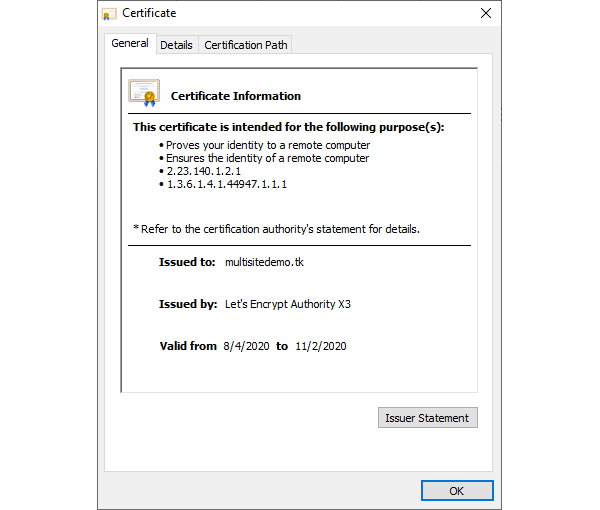
This brings up a screenshot like the one shown below.
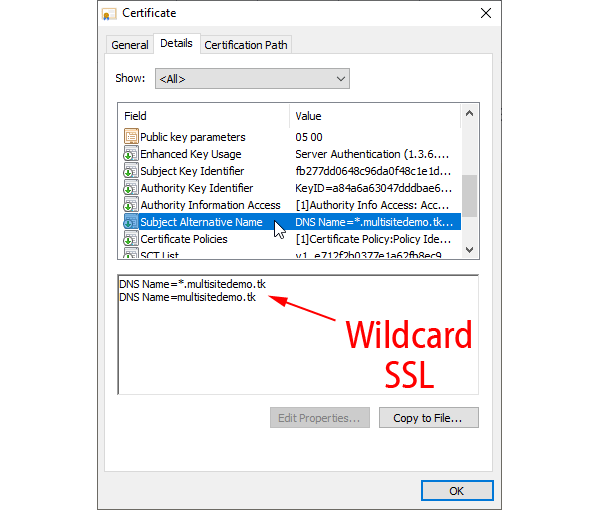
Click on the Details tab and scroll to the Subject Alternative Name field. As you can see in the screenshot below, Wildcard SSL is installed, active, and valid.
If you need help adding entries to DNS records, check out our documentation. In addition to showing you how to configure DNS settings for Multisite wildcard SSL on WPMU DEV hosting, we also provide links to usage guides of other leading hosting providers, guides on setting up nameservers, etc.
And if you need any help setting up Multisite with subdomains or have any questions about using wildcard SSL feel free to contact our support team. We specialize in Multisite and we’re here 24/7 to provide you with all the help and assistance you need.
Source: premium.wpmudev.org