If you followed my last post where I created an Ansible Playbook to complete a full setup of a NetApp simulator, you would have seen that it was one gigantic playbook.
Working with one gigantic playbook can be a little overwhelming, a little bit messy and as a result, makes it hard to reuse certain tasks in other playbooks.
I have been working this week on creating a multipart Ansible playbook, whereby I have one main playbook, that calls upon multiple smaller playbooks. On top of this, I have also created a separate variables file that gets referenced within the YAML files.
As a bonus, there is a new part of this automation whereby the NFS datastores we created get automatically mounted to each ESXi host within my VMware vSphere environment.
Multi-Part Ansible Playbook Files
Below is a list of files that I have created along with a description of what each one of them does. Later on, we’ll take a look inside and list the changes that have occurred since my previous post:
- netapp_full_install_multi-part.yml (the main playbook that calls each of the other playbooks, 01 – 06)
- variables.yml (contains all the variables that are called upon within each file below)
- 01_install_licenses_setup_ntp.yml (NetApp Simulator: install NetApp licenses, set NTP and Timezone)
- 02_create_aggregate.yml (NetApp Simulator: rename root aggregate, create and online data aggregate)
- 03_create_svm.yml (NetApp Simulator: create SVM, start NFS, create NFS export rule, add DNS, create first NFS volume
- 04_network_setup.yml (Netapp Simulator: setup VLAN, create broadcast domain, create subnet, create NFS lif)
- 05_create_volume.yml (NetApp Simulator: create additional NFS volume)
- 06_mount_nfs_datastore.yml (VMware vSphere: Mount the 2 NetApp NFS volumes to ESXi)
Ansible Playbook Imports
Let’s take a look into the main file ‘netapp_full_install_multi-part.yml’. This file is used to call upon all playbooks labelled from 01 – 06
The way that it calls each playbook is via a command called ‘import_playbook’. You can see from the code below that this approach is much neater and structured than having all your commands in 1 big playbook. It also allows you to re-use some of these playbooks such as 05_create_volume.yml for any subsequent volume creation, simply by changing the relevant components in the variables file.
##########################################################
# This Ansible Playbook calls multiple sub yml playbooks #
########################################################## ---
# Install Licenses and Setup NTP
- import_playbook: 01_install_licenses_setup_ntp.yml # Rename Root Aggregate, Create and online new data aggregate
- import_playbook: 02_create_aggregate.yml # Crete SVM, start NFS, create NFS export rule, add DNS settings to SVM, create NFS volume
- import_playbook: 03_create_svm.yml # Create NFS vlan, create broadcast-domain, create subnet, create NFS lif
- import_playbook: 04_network_setup.yml # Create an additional NFS volume
- import_playbook: 05_create_volume.yml # Mount NFS datastore to ESXi hosts
- import_playbook: 06_mount_nfs_datastore.yml esxihost=vmhost3.vmlab.local
- import_playbook: 06_mount_nfs_datastore.yml esxihost=vmhost4.vmlab.local
- import_playbook: 06_mount_nfs_datastore.yml esxihost=vmhost5.vmlab.local
- import_playbook: 06_mount_nfs_datastore.yml esxihost=vmhost6.vmlab.local
Ansible Playbook Variables File
If you remember in my previous post, we had a huge amount of variables at the beginning of the file, if you don’t remember it looked like this:
vars:
login: &login
hostname: 192.168.1.50 # NetApp Cluster IP
username: ansible # Cluster User
password: Password123 # Cluster Password
https: true
validate_certs: false
clustername: CLUSTER96 # Cluster Name
ntpservers: 192.168.1.101 # Time Server
aggrrootoldname: aggr0_CLUSTER96_01 # Aggregate root name after Cluster Setup
aggrrootnewname: aggr0_CLUSTER96_01_root # New Aggregate root name
aggrdataname: aggr1_CLUSTER96_01_data # New Data Aggregate name
diskcount: 26 # Number of disks to add to the Data Aggregate
svmname: SVM1 # SVM or Vserver name
rootvolname: SVM1_root # SVM root vol name
rootvolaggr: aggr1_CLUSTER96_01_data # Which aggregate to place the SVM root vol
rootvolsecurity: unix # SVM Root vol security stype
allowedaggrs: aggr1_CLUSTER96_01_data # Allowed SVM data Aggregates
allowedprotocols: nfs # Allowed SVM Protocols
nfsclientmatchsubnet: 192.168.2.0/24 # Allow this subnet to access NFS
svmdnsdomain: vmlab.local # SVM DNS Domain
svmdnsservers: 192.168.1.101 # SVM DNS Servers
nfsvolname: NFS_vol1 # First NFS Vol withint your SVM
nfsaggr: aggr1_CLUSTER96_01_data # Which Aggregate to place the NFS Vol on
nfsvolsize: 100 # NFS Vol Size GB
vlan: 5 # NFS VLAN
parentinterface: e0d # Interface where VLAN will be created
broadcastname: NFS # Create a new Broadcast Domain with this name
broadcastports: ["CLUSTER96-01:e0d-5"] # Add ports here - multiple ports use comma
subnetname: NFS-Subnet # NFS Subnet Name
subnetnetwork: 192.168.2.0/24 # NFS Network Subnet
subnetiprange: ["192.168.2.51-192.168.2.52"] # NFS LIF IP within the NFS subnet pool
lifinterfacename: nfs_lif01 # SVM NFS Lif name
lifhomeport: e0d-5 # Home port for SVM NFS Lif
lifhomenode: CLUSTER96-01 # Home node for SVM NFS Lif
lifaddress: 192.168.2.51 # SVM NFS Lif IP Address
lifnetmask: 255.255.255.0 # SVM NFS Lif Subnet
vservername: SVM1 # SVM or Vserver Name
aggr: aggr1_CLUSTER96_01_data # Which Aggregate to create second NFS vol
vol_name: ansibleVol # Second NFS vol name
I have now created a variables.yml file, that each sub-playbook refers too. This approach is much neater, more user friendly, and makes it easy to re-use parts of the code.
This is what the new variables.yml file looks like:
##########################################################
# Variable File for 'netapp_full_install_multi-part.yml' #
########################################################## # Cluster Login
clusterip: 192.168.1.50
user: ansible
pass: Password123
https_option: true
validate_certs_option: false # Variables for '01_install_licenses_setup_ntp.yml'
clustername: CLUSTER96
ntpservers: 192.168.1.101 # Variables for '02_create_aggregate.yml'
aggrrootoldname: aggr0_CLUSTER96_01
aggrrootnewname: aggr0_CLUSTER96_01_root
aggrdataname: aggr1_CLUSTER96_01_data
diskcount: 26 # Variables for '03_create_svm.yml'
svmname: SVM1
rootvolname: SVM1_root
rootvolaggr: aggr1_CLUSTER96_01_data
rootvolsecurity: unix
allowedaggrs: aggr1_CLUSTER96_01_data
allowedprotocols: nfs
nfsclientmatchsubnet: 192.168.2.0/24
svmdnsdomain: vmlab.local
svmdnsservers: 192.168.1.101
nfsvolname1: NFS_vol1
nfsaggr: aggr1_CLUSTER96_01_data
nfsvolsize: 100 # Variables for '04_network_setup.yml'
clustername: CLUSTER96
vlan: 5 # NFS VLAN
parentinterface: e0d # Interface where VLAN will be created
broadcastname: NFS
broadcastports: ["CLUSTER96-01:e0d-5"] # Add ports here - multiple ports use comma
subnetname: NFS-Subnet
subnetnetwork: 192.168.2.0/24
subnetiprange: ["192.168.2.51-192.168.2.52"]
lifinterfacename: nfs_lif01
lifhomeport: e0d-5
lifhomenode: CLUSTER96-01
lifaddress: 192.168.2.51
lifnetmask: 255.255.255.0
vservername: SVM1 # Variables for '05_create_volume.yml'
aggr: aggr1_CLUSTER96_01_data
nfsvolname2: NFS_vol2
vservername: SVM1 # Variables: for '06_mount_nfs_datastore.yml'
vcenter_server: 192.168.1.104
vcenter_user: ansible@vsphere.local
vcenter_pass: Password123
voltype: nfs
Ansible Playbooks 01 – 06
I have taken all the tasks out of my previous gigantic playbook and created 6 smaller playbooks. Within each of these 6 playbooks you will notice that nearly all values are variables, as opposed to hardcoded values. These variables are all controlled via the variables.yml file. The benefits of creating a variables.yml file is that there is no need to edit any of the playbooks labelled 01- – 06 and that it makes the playbooks more portable.
Below is the code for playbook ’01_install_licenses_setup_ntp.yml’. Nearly all the settings have a variable set as the value. To reference the variables.yml file, we need to add the following code to our playbooks:
vars_files:
- variables.yml
I have added a debug msg at the end of each playbook for your reference. This debug message appears once the playbook has completed its run:
- debug: msg="Licenses have been installed on {{ clustername }}" Ansible Playbook Code 01_install_licenses_setup_ntp.yml
#########################################################################################################################################
# -= Requirements =-
#
# 1. Make sure ansible user has been created
# 1a. security login create -vserver CLUSTER96 -role admin -application http -authentication-method password -user-or-group-name ansible
# 1b. security login create -vserver CLUSTER96 -role admin -application ontapi -authentication-method password -user-or-group-name ansible
########################################################################################################################################## ---
- hosts: localhost
gather_facts: false
name: NetApp licensing
vars:
login: &login
hostname: "{{ clusterip }}"
username: "{{ user }}"
password: "{{ pass }}"
https: "{{ https_option }}"
validate_certs: "{{ validate_certs_option }}"
vars_files:
- variables.yml
tasks:
- name: Install Licenses
na_ontap_cluster:
state: present
cluster_name: "{{ clustername }}"
license_code: "{{ item }}"
<<: *login
loop:
- CAYHXPKBFDUFZGABGAAAAAAAAAAA
- APTLYPKBFDUFZGABGAAAAAAAAAAA
- WSKTAQKBFDUFZGABGAAAAAAAAAAA
- CGVTEQKBFDUFZGABGAAAAAAAAAAA
- OUVWXPKBFDUFZGABGAAAAAAAAAAA
- QFATWPKBFDUFZGABGAAAAAAAAAAA
- UHGXBQKBFDUFZGABGAAAAAAAAAAA
- GCEMCQKBFDUFZGABGAAAAAAAAAAA
- KYMEAQKBFDUFZGABGAAAAAAAAAAA
- SWBBDQKBFDUFZGABGAAAAAAAAAAA
- YDPPZPKBFDUFZGABGAAAAAAAAAAA
- INIIBQKBFDUFZGABGAAAAAAAAAAA
- name: Set NTP
na_ontap_ntp:
state: present
version: auto
server_name: "{{ ntpservers }}"
<<: *login
- name: Set Timezone
na_ontap_command:
command: ['cluster', 'date', 'modify', '-timezone', '{{ timezone }}']
privilege: admin
<<: *login
- debug: msg="Licenses have been installed on {{ clustername }}"
Ansible Playbook 06_mount_nfs_datastore.yml
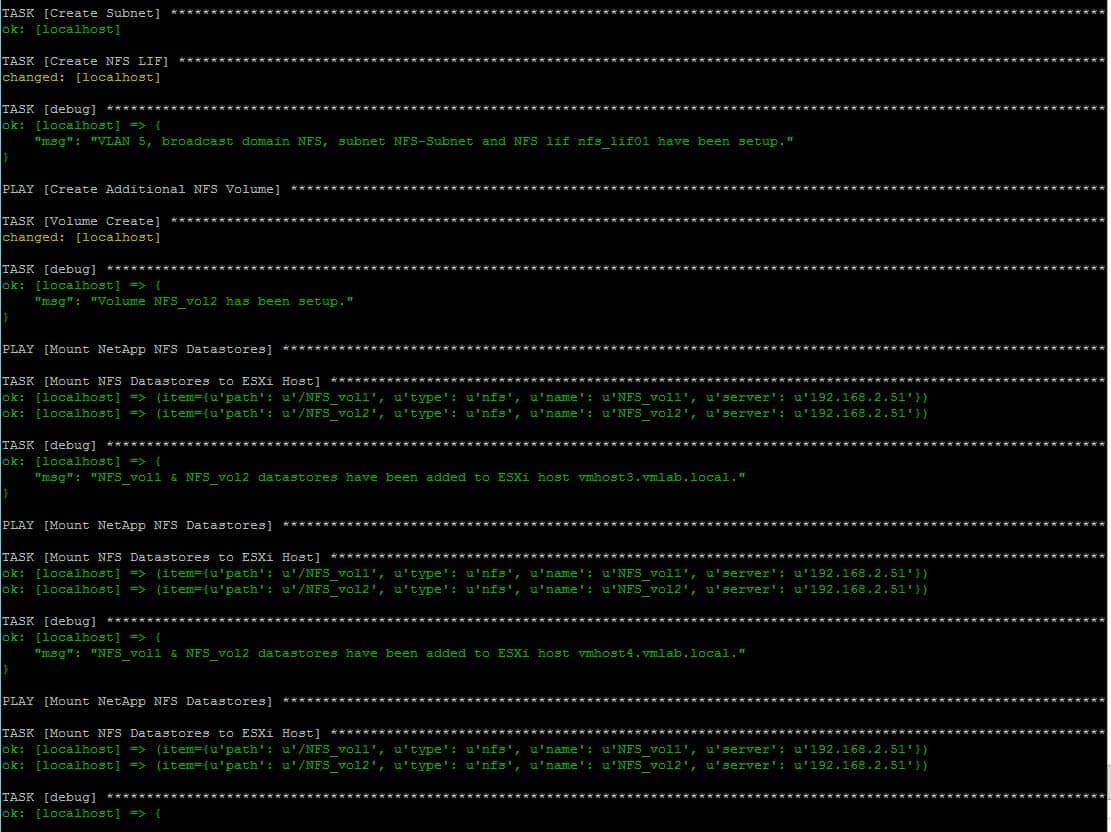
This playbook is a new addition to my build. It will take the 2 NFS volumes that we created on our NetApp simulator and mount them into my vSphere 6.7 environment.
Within the ‘netapp_full_install_multi-part.yml’ file you can see that I call this playbook 4 times. Each run sets the ‘esxihost’ variable to a different VMware ESXi host.
# Mount NFS datastore to ESXi hosts
- import_playbook: 06_mount_nfs_datastore.yml esxihost=vmhost3.vmlab.local
- import_playbook: 06_mount_nfs_datastore.yml esxihost=vmhost4.vmlab.local
- import_playbook: 06_mount_nfs_datastore.yml esxihost=vmhost5.vmlab.local
- import_playbook: 06_mount_nfs_datastore.yml esxihost=vmhost6.vmlab.local
Back to the ’06_mount_nfs_datastore.yml’ playbook. The loop below mounts the 2 NFS volumes to the VMware ESXi host set within the ‘esxihost’ variable
---
- hosts: localhost
name: Mount NetApp NFS Datastores
gather_facts: false
vars:
login: &login
hostname: "{{ vcenter_server }}"
username: "{{ vcenter_user }}"
password: "{{ vcenter_pass }}"
validate_certs: no
vars_files:
- variables.yml
tasks:
- name: Mount NFS Datastores to ESXi Host
vmware_host_datastore:
state: present
datastore_name: "{{ item.name }}"
datastore_type: "{{ item.type }}"
nfs_server: "{{ item.server }}"
nfs_path: "{{ item.path }}"
nfs_ro: no
esxi_hostname: "{{ esxihost }}"
<<: *login
loop:
- { 'name': '{{ nfsvolname1 }}', 'server': '{{ lifaddress }}', 'path': '/{{ nfsvolname1 }}', 'type': '{{ voltype }}'}
- { 'name': '{{ nfsvolname2 }}', 'server': '{{ lifaddress }}', 'path': '/{{ nfsvolname2 }}', 'type': '{{ voltype }}'}
- debug: msg="{{ nfsvolname1 }} & {{ nfsvolname2 }} datastores have been added to ESXi host {{ esxihost }}."
I tried to figure out a way to put all the ESXi hosts into a variable as well as the number of datastores that I wish to mount and attempt to do 2 loops. One loop being the ESXi hosts and the second being the volumes. However, I’m yet to get that part working. When I do figure it out, I will update this post.
Ansible Playbooks on GitHub
I have copied all these Playbooks up to my GitHub repository. If want to copy this code, change some variables and try it out, just make sure all the files are in the same directory on your Ansible host.
If you have any questions or suggestion please let me know by leaving a comment below.
The post Creating Multi-Part Ansible Playbook With Variables – NetApp and VMware appeared first on SYSADMINTUTORIALS IT TECHNOLOGY BLOG.