
I am a new CentOS Linux 7.0 server user. How do I set up an OpenVPN Server on CentOS Linux version 7.0 server to shield my browsing activity from bad guys on public Wi-Fi, and more?
Introduction OpenVPN is a full-featured SSL VPN (virtual private network). It implements OSI layer 2 or 3 secure network extension using the SSL/TLS protocol. It is an open source software and distributed under the GNU GPL. A VPN allows you to connect securely to an insecure public network such as wifi network at the airport or hotel. VPN is also required to access your corporate or enterprise or home server resources. You can bypass the geo-blocked site and increase your privacy or safety online. This tutorial provides step-by-step instructions for configuring an OpenVPN server on CentOS Linux 7.0 server.
Procedure: CentOS 7.0 Set Up OpenVPN Server In 5 Minutes
The steps are as follows:
Step 1 – Update your system
Run the yum command :{vivek@centos7:~ }$ sudo yum update
Step 2 – Find and note down your IP address
Use the ip command as follows:{vivek@centos7:~ }$ ip a
{vivek@centos7:~ }$ ip a show eth0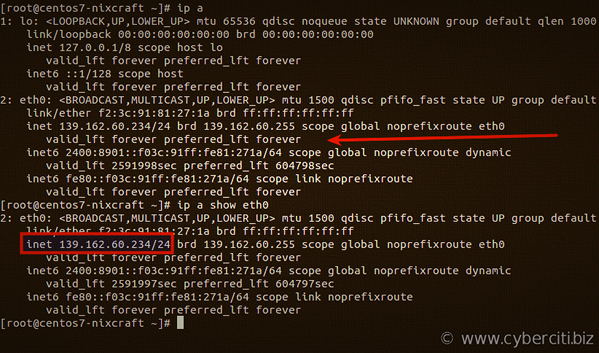
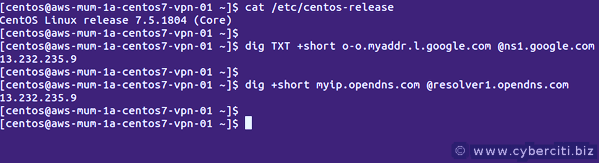
Another option is to run the following dig command/host command to find out your public IP address from Linux command line:{vivek@centos7:~ }$ dig +short myip.opendns.com @resolver1.opendns.com
OR{vivek@centos7:~ }$ dig TXT +short o-o.myaddr.l.google.com @ns1.google.com | awk -F'"' '{ print $2}'
A note about IP address
Most CentOS Linux cloud servers have two types of IP address:
- Public static IP address directly assigned to your box and routed from the Internet. For example, Linode, Digital Ocean, and others gives you direct public IP address.
- Private static IP address directly attached to your server and your server is behind NAT with public IP address. For example, AWS EC2/Lightsail give you this kind of NAT public IP address.
The script will automatically detect your networking setup. All you have to do is provide correct IP address when asked for it.
Step 3 – Download and run centos7-vpn.sh script
I am going to use the wget command:{vivek@centos7:~ }$ wget https://raw.githubusercontent.com/Angristan/openvpn-install/master/openvpn-install.sh -O centos7-vpn.sh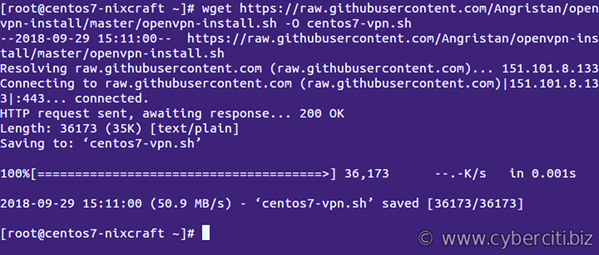
Setup permissions using the chmod command{vivek@centos7:~ }$ chmod +x centos7-vpn.sh
One can view the script using a text editor such as vim/vi :{vivek@centos7:~ }$ vi centos7-vpn.sh
Run centos7-vpn.sh to install OpenVPN server
Now all you have to do is:{vivek@centos7:~ }$ sudo ./centos7-vpn.sh
Sample session from AWS/Lightsail where my cloud server is behind NAT: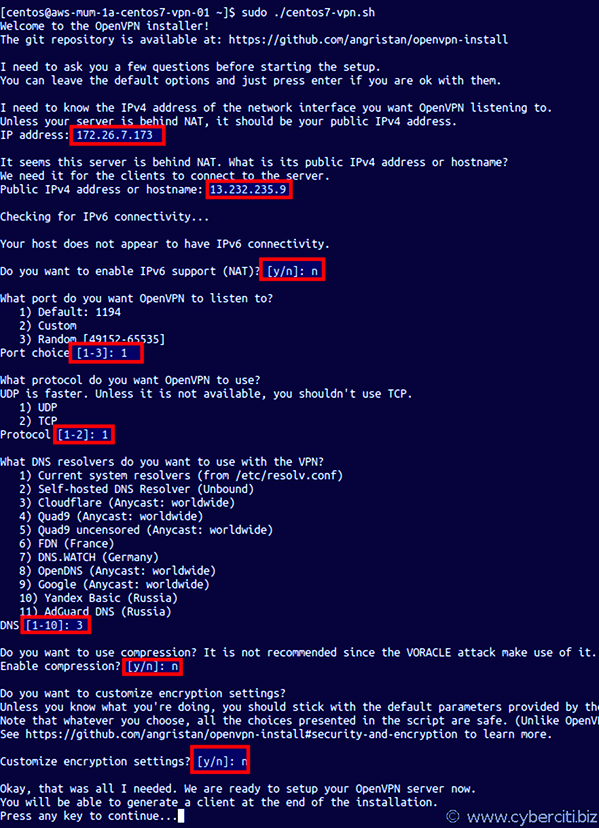
Sample session from Linode/DO server where cloud server has direct public IPv4 address: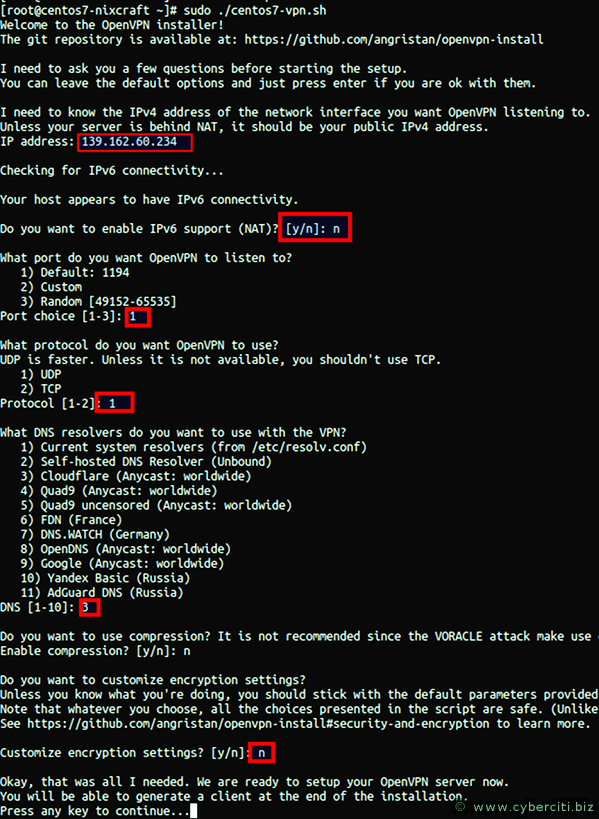
To avoid problem always choose DNS as 1.1.1.1 or Google DNS. Those are fast DNS server and reached from anywhere on the Internet.
How do I start/stop/restart OpenVPN server on CentOS 7.0 ?
{vivek@centos7:~ }$ sudo systemctl stop openvpn@server # <--- stop server
{vivek@centos7:~ }$ sudo systemctl start openvpn@server # <--- start server
{vivek@centos7:~ }$ sudo systemctl restart openvpn@server # <--- restart server
{vivek@centos7:~ }$ sudo systemctl status openvpn@server # <--- get server status
Step 4 – Connect an OpenVPN server using IOS/Android/Linux/Windows client
On server your will find a client configuration file called ~/desktop.ovpn. All you have to do is copy this file to your local desktop using the scp command:{vivek@centos7:~ }$ scp vivek@139.162.60.234:~/deskcop.ovpn .
Next, provide this file to your OpenVPN client to connect:
- Apple iOS client
- Android client
- Apple MacOS (OS X) client
- Windows 8/10 client
Linux Desktop: OpenVPN client configuration
First, install the openvpn client for your desktop, enter:{vivek@centos7:~ }$ sudo yum install openvpn
OR{vivek@centos7:~ }$ sudo apt install openvpn
Next, copy desktop.ovpn as follows:{vivek@centos7:~ }$ sudo cp desktop.ovpn /etc/openvpn/client.conf
Test connectivity from the CLI:{vivek@centos7:~ }$ sudo openvpn --client --config /etc/openvpn/desktop.conf
Your Linux desktop system will automatically connect when computer restart using openvpn script/service:{vivek@centos7:~ }$ sudo systemctl enable openvpn@client
{vivek@centos7:~ }$ sudo systemctl start openvpn@client
Step 5 – Verify/test the connectivity
Execute the following commands after connecting to OpenVPN server from your Linux desktop:{vivek@centos7:~ }$ ping 10.8.0.1 #Ping to the OpenVPN server gateway
{vivek@centos7:~ }$ ip route #Make sure routing setup working
{vivek@centos7:~ }$ dig TXT +short o-o.myaddr.l.google.com @ns1.google.com #Must return public IP address of OpenVPN server
A note about trouble shooting OpenVPN server and client issues
Check OpenVPN server for errors:{vivek@centos7:~ }$ journalctl --identifier openvpn

Is firewall rule setup correctly on your server? Use the cat command to see rules:{vivek@centos7:~ }$ cat /etc/iptables/add-openvpn-rules.sh
#!/bin/sh iptables -t nat -A POSTROUTING -s 10.8.0.0/24 -o eth0 -j MASQUERADE iptables -A INPUT -i tun0 -j ACCEPT iptables -A FORWARD -i eth0 -o tun0 -j ACCEPT iptables -A FORWARD -i tun0 -o eth0 -j ACCEPT iptables -A INPUT -i eth0 -p udp --dport 1194 -j ACCEPT |
Another option is to run iptables command and sysctl command commands to verify NAT rule setup on your server:{vivek@centos7:~ }$ sudo iptables -t nat -L -n -v
{vivek@centos7:~ }$ sysctl net.ipv4.ip_forward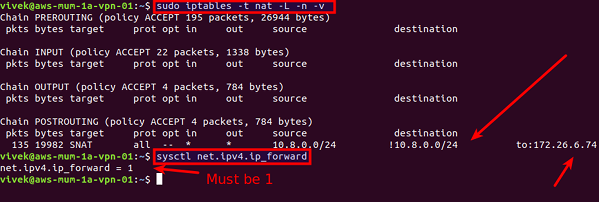
Insert the rules if not inserted from /etc/iptables/add-openvpn-rules.sh{vivek@centos7:~ }$ sudo sh /etc/iptables/add-openvpn-rules.sh
{vivek@centos7:~ }$ sudo sysctl -w net.ipv4.ip_forward=1
Is OpenVPN server running and port is open? Use the ss command or netstat command and pidof command/ps command:{vivek@centos7:~ }$ netstat -tulpn | grep :1194 ## 1194 is the openvpn server port ##
{vivek@centos7:~ }$ ss -tulpn | grep :1194 ## 1194 is the openvpn server port ##
{vivek@centos7:~ }$ ps aux | grep openvpn ## is the openvpn server running? ##
{vivek@centos7:~ }$ ps -C openvpn ## is the openvpn server running? ##
{vivek@centos7:~ }$ pidof openvpn ## find the openvpn server PID ##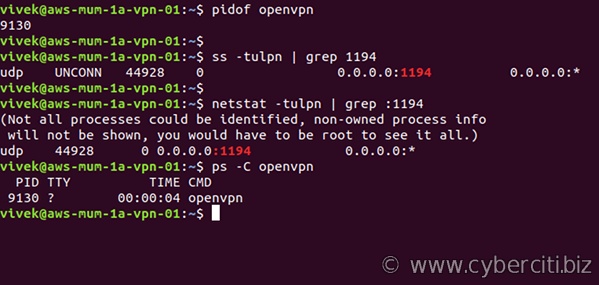
If not running, restart the OpenVPN server:{vivek@centos7:~ }$ sudo systemctl restart openvpn@server
Look out for errors:{vivek@centos7:~ }$ sudo systemctl status openvpn@server
Can the Linux desktop client connect to the OpenVPN server machine? First you need to run a simple test to see if the OpenVPN server port (UDP 1194) accepts connections:{vivek@centos7:~ }$ nc -vu 139.162.60.234 1194
Connection to 139.162.60.234 1194 port [udp/openvpn] succeeded!
If not connected it means either a Linux desktop firewall or your router is blocking access to server. Make sure both client and server using same protocol and port, e.g. UDP port 1194.
Conclusion
Congratulations. You successfully set up an OpenVPN server on CentOS Linux 7.0 server running in the cloud. See the OpenVPN website here and script site here for additional information.