Keeping backups is one of the most important things any website owner has to do. It allows you to prevent losing your website entirely due to unforeseen circumstances like server crashes, hacking or website misconfiguration. Thankfully, WordPress has dozens of plugins that will help you create and keep a backup of your website so you can revert it back to its last and latest working condition when calamities occur.
Here comes the dilemma: with dozens of them out there, it can be hard and confusing for you to choose which one suits your needs the best. But, if you have a website that generates quite a bit of traffic at the very least, then you’ll certainly want to have a backup solution that is proven, trusted and easy to use.
Among dozens of backup plugins out there, there is one that meets all of these criteria and more: BlogVault.
In this article, we’re going to take a look at BlogVault and how it became probably the best WordPress backup plugin and solutions.
Let’s get started!
Summary
BlogVault is currently the best WordPress backup plugin and only a few other options can rival it for the breadth of functionality it offers besides backing up functions.
 | |
| Price | From $7/month |
| Free Trial | No but the free Restrict Content give you an idea of what to expect. |
| What we liked | Easy to set up and get started |
| Dead-simple migration | |
| Set and forget, with full peace of mind | |
| Works on all web hosts (even free ones) | |
| Supported and embraced by major vendors such as WPEngine | |
| What we didn’t like | Pricing can be somewhat confusing |
| Requires FTP access (strict) | |
| Downloaded backups need to be restored manually | |
| Can get pricey you are charging this to your clients | |
| Ease of use | |
| Reliability | |
| Support | |
| Value | |
| Overall | |
| Visit website now to learn more |
What is BlogVault?
BlogVault is a backup plugin and service.
They offer backups, security, maintenance and staging solutions for websites of any size that is built on WordPress. It’s not just a backup plugin that helps you create, manage and restore your backups.
It also has a powerful suite of tools that will aid you in the backup, restoration, management, and security of your website. It’s basically an all-in-one plugin and service.
Features
To better understand what BlogVault is, let’s take a look at its features.
Backups
One of the main features of BlogVault is creating and managing backups and this is what most of you came here for, so we’re going to get in a little bit deep into this.
BlogVault’s backup feature is different than its competitors because it uses incremental backup technology, eliminating the stress on your server. That means no matter how many visitors your website has at any given time, BlogVault can initiate a backup and it will have zero effect to your site’s performance.
It backups your database and files on a daily basis, automatically. When it backs up your site for the first time, it is synced in small packages to avoid server overload. Once the first backup is completed, the next ones will be incremental meaning that it will only sync files that have a change, eliminating unnecessary server access and usage.
For WooCommerce powered sites, it has a real-time backup feature. This will trigger anytime there’s an order placed and a transaction is made.
Another one of the features that separate BlogVault from its competitor is its ability to backup, restore and even migrate an entire multisite network.
Depending on which plan you’re on, backups are kept for up to 365 days before getting overwritten by newer ones. They are kept encrypted in BlogVault servers and has multiple copies maintained for redundancy and integrity.
One-Click Migration
Okay, the truth is, it’s really not one click and you’re done, but the entire process is as easy and simple as a single click, so you can probably pass it on as one-click migration. We were initially introduced to this service when we performed a migration via WPEngine, as part of our review of the hosting service, and we were very impressed then.
Basically, you’ll just have to get the FTP details of your new website or host, choose what version of your website’s backup you want to migrate, select the folder containing the new WordPress installation on your new host, click migrate and done.
Sounds easy? It really is. Y
ou’ll find more details about this and other features in the Getting Started section.
Website Recovery
As simple as migration, the process is fairly simple. Simply ready your site’s FTP credentials and you’re good to go.
If your site got hacked or is damaged by a new plugin, theme or even a new WordPress update, you can easily revert back to a previously working version of your site.
By default, your website is backed up on a daily basis, so you can easily return your site to what it was the day before your website got hacked or messed up by a certain update or misconfiguration.
If you have real-time backup enabled, you can even restore your site to what it was mere hours before whatever terrifying event happened to your site.
Security
BlogVault comes with security features such as firewall, site scanning, admin logins, and log out tracking, etc. You can view who logins to your site and what kinds of bots are visiting it. It also helps you find any malicious files that somehow infiltrated your WordPress site and crush it with ease.
Multiple Website Management
Adding a site to BlogVault not only keeps it secure and backed up, but it also helps you manage it. From one dashboard, you can add as many sites as you want (depending on your plan) and manage them directly within there.
- You can update, install, upload, activate, deactivate or delete themes and plugins.
- Yes, you can upload themes and plugins to your site through BlogVault
- You can update WordPress core itself.
- You can add, edit or delete users.
- Generate beautiful reports that display in-depth website activity on a select period of time.
WooCommerce Backups
BlogVault comes with a real-time backup feature for WooCommerce sites, which is available for Advanced plans. It triggers a back up anytime an order is placed or when a transaction is carried out so you won’t lose any order or transaction in case of failure.
Those are some really nice features, aren’t they? Let’s see them (and more) in action in the next section.
See more feature details
Getting Started
Now that you have an idea about what BlogVault has to offer, it’s time to see it in action! In this section, you’ll see how each of its features work and peek at how its dashboard looks like. We’ll go through the installation, activation, and usage of BlogVault. For your information, you can get a free 7-day trial of BlogVault, where you can check it out on your own! You might want to try it out and then you follow along to see it for yourself.
Let’s begin!
Installing BlogVault
The first thing you’d want to do is to register to BlogVault. Once you’ve registered and have your email confirmed, the first thing you’ll see is a dialogue box asking you to add the site you want to back up to your BlogVault account.

Once you’ve added your website’s URL and pressed “Next Step” button, you’ll be taken to the next page where you can choose to either install the Blogvault plugin manually to your site or have BlogVault install it for you.
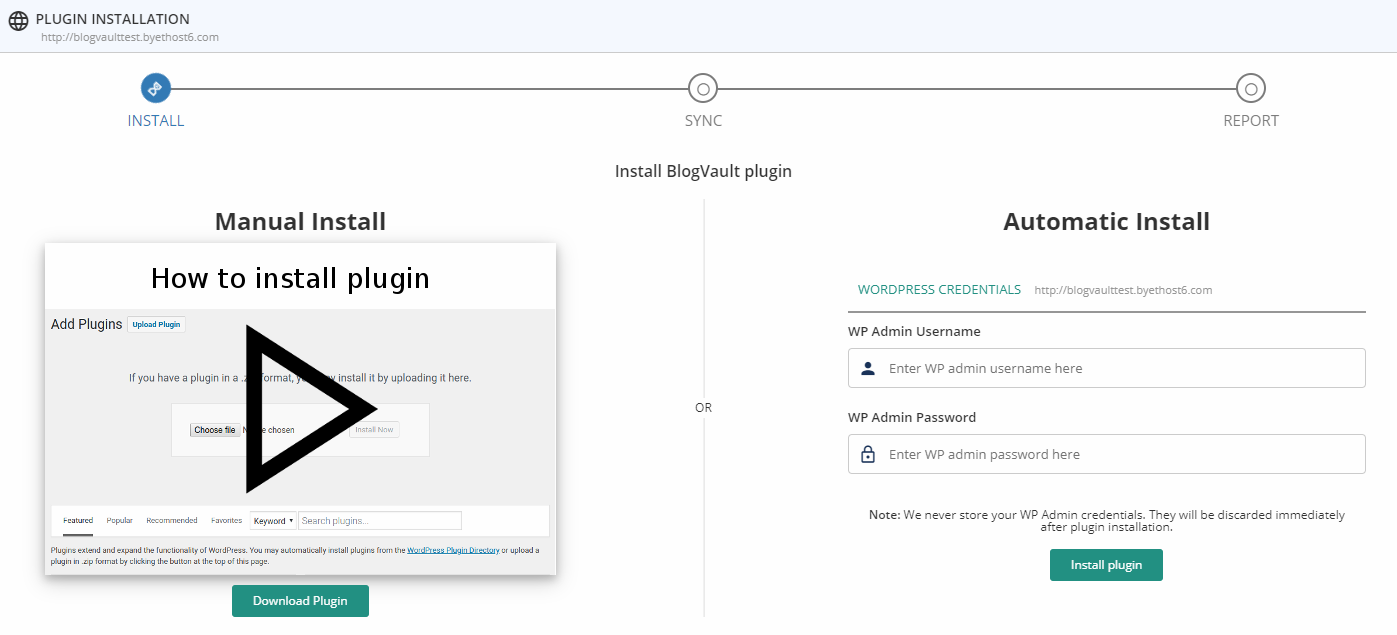
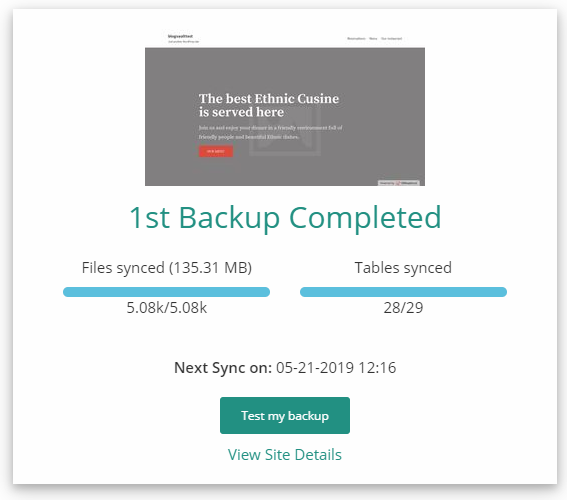
Choose your preferred method and once the plugin is installed, click the Plugin already installed? Check now! button at the bottom to let BlogVault check whether the plugin was successfully installed or not. Once it detects that the plugin is installed and activated on the target site, it will start the first-time sync.

Once the first-time backup has completed successfully, you’ll get the following screen, showing you the details of your first backup:
And you’re done! You actually don’t have to do anything else anymore if you only want backups. BlogVault will now continue to automatically backup your site on a daily basis (or real-time if you have it enabled and is available for your plan).
BlogVault Dashboard
When you have connected a site to your BlogVault account, you can now manage it straight from your BlogVault dashboard. Here, you can see the list of all sites you’ve connected to your BlogVault account. There are icons that allow you to preview each of your site’s current status, such as whether there are WordPress plugins that need an update, or whether a certain BlogVault feature is enabled or not.
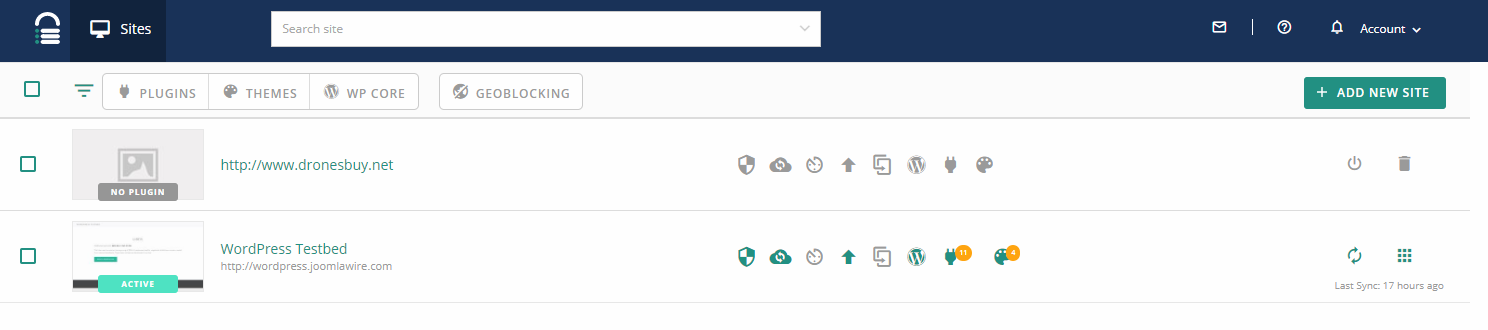
The screenshot above displays a BlogVault account with two sites connected. One of them doesn’t have the plugin installed and the other has the plugin installed and activated. You can notice the icons on the second site, which has the BlogVault plugin installed and activated, displaying that there are themes and plugins that need updating. The green colored icons indicate that the feature or service is currently active. From left to right, these are security, backup, real-time backup, uptime monitoring, staging, WordPress core version, plugins, and themes. If the latter three needs updates, they’ll have badges on them, just like what you can see from the picture above.
The Site Dashboard
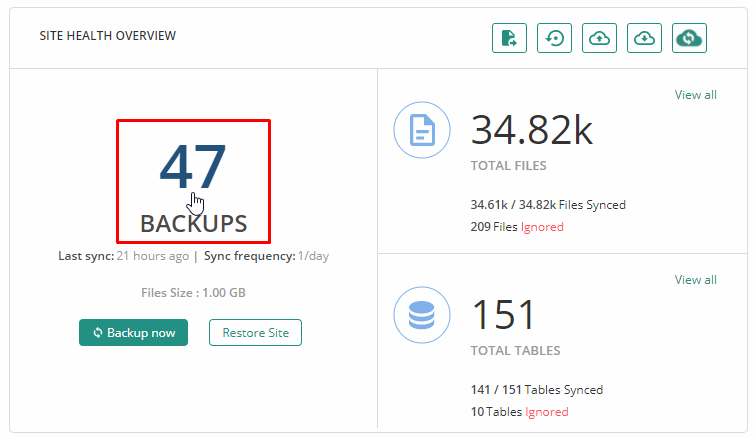
Clicking on one of your sites will bring you to that particular site’s dashboard containing a more detailed overview of your its status. There are different sections displaying information about the site.
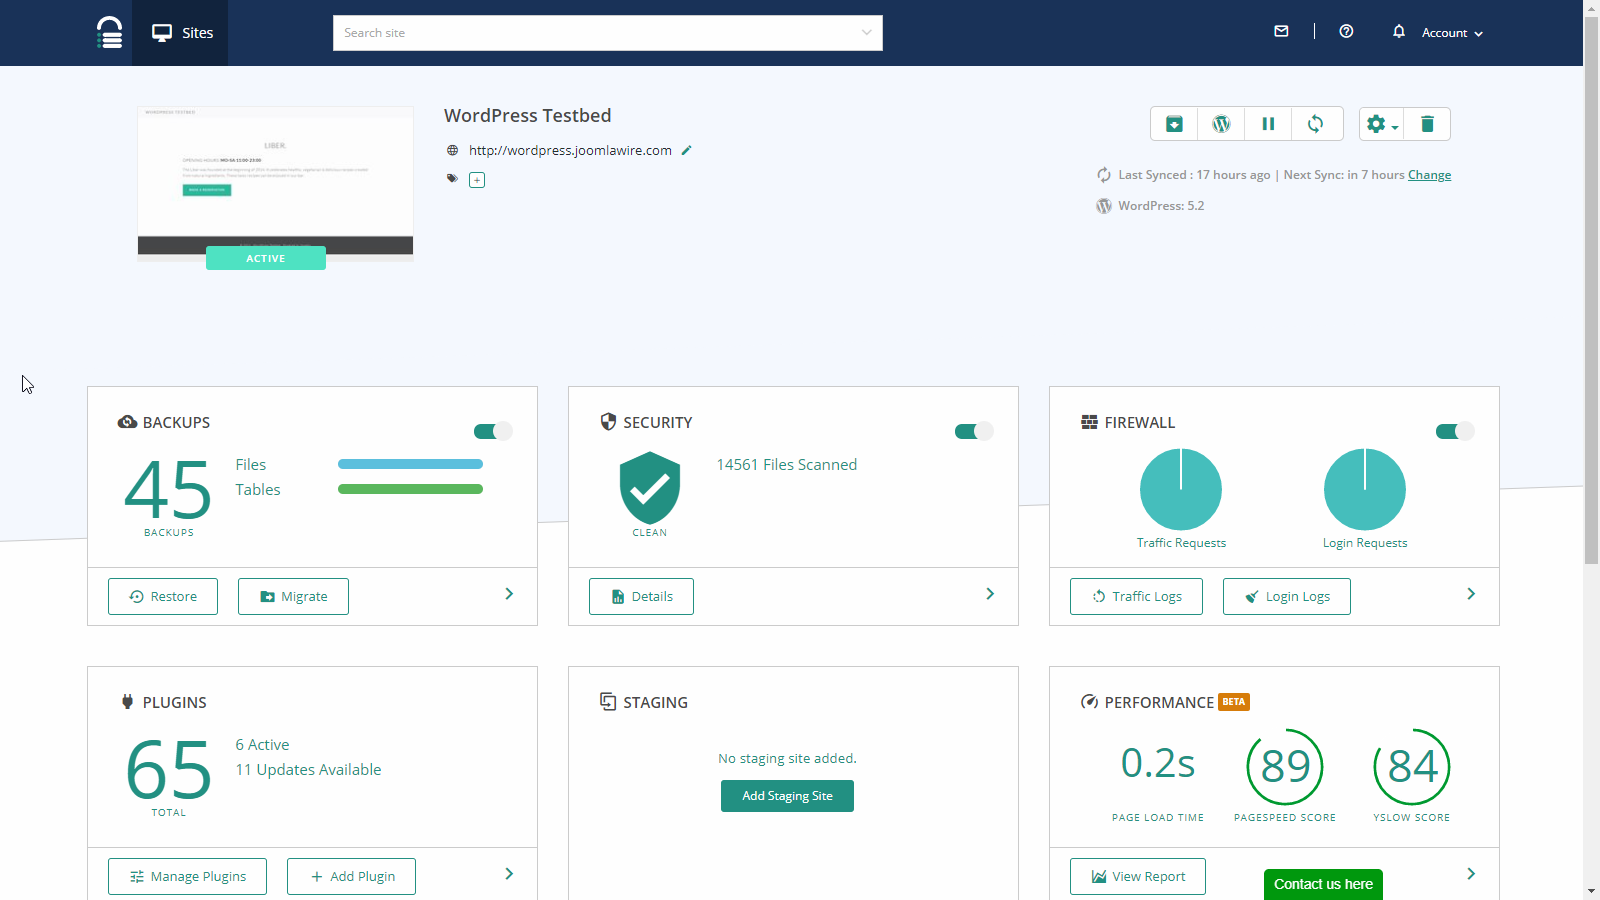
You can view how many backups were created, how many themes and plugins are installed, and which of them are active or not, etc.
You can also see information about your site’s performance, its security status, whether there’s a staging site set up or not, your website’s uptime status, how many WordPress users your site has, etc.
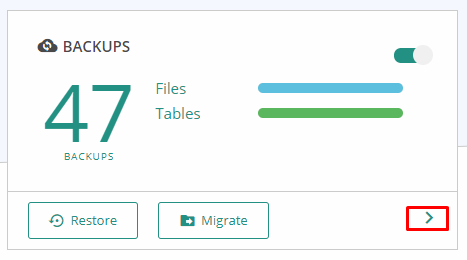
Clicking on the right arrow in the lower right corner of a section brings you to their specific page, allowing you to view more detailed information related to that section and to access and configure additional settings for it.
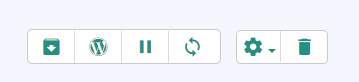
On the upper right corner of the site dashboard, there are quick links that allow you to reinstall the BlogVault plugin on your site, access your site’s WordPress dashboard, pause syncing (backup), trigger manual sync, access site settings and delete the site from your BlogVault account.
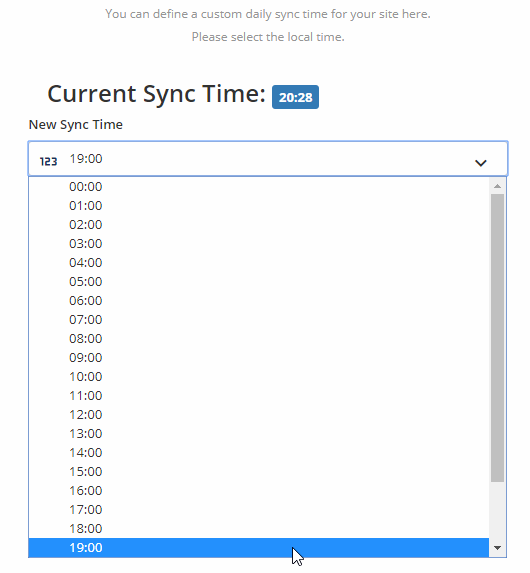
Clicking on the gear icon brings up a submenu containing additional advanced settings you might want to configure. However, unless you know what you’re doing, it’s better not to touch these, except for one that you can and might want to alter: the Sync Time setting.
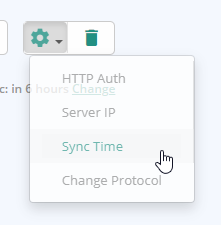
This setting will let you set your own preferred sync time. So, for example, you update your site with new content and stuff every 10 AM, you might want to set the daily sync to happen either before or after you post new content on your site.
WordPress Management Made Easy
From this dashboard, you have can install new themes or plugins, activate or update them, create, delete or edit WordPress users, and more. It’s quite similar to MainWP, but is more on backups, restoration, and migration. If you want features like MainWP, but only have a couple of sites to manage, BlogVault could be the better choice.
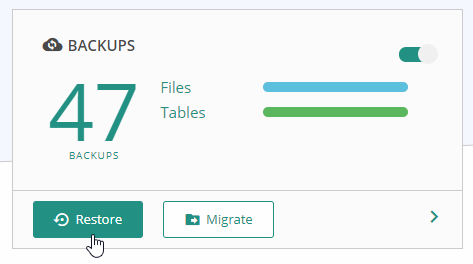
Backups
From your site’s dashboard, clicking the right arrow on the Backups section will bring you to the Backups Dashboard where you can see more detailed info about your site’s backups.
Try for Free Now
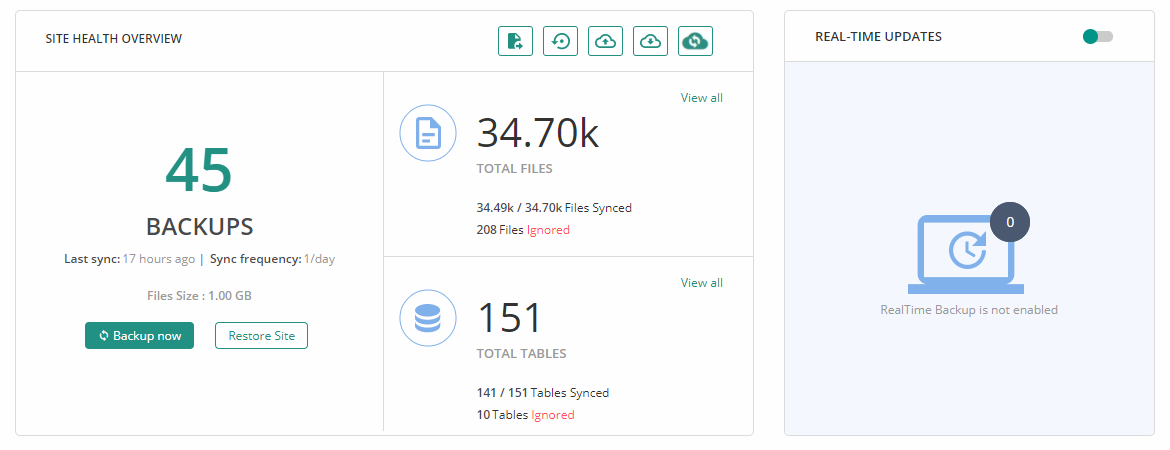
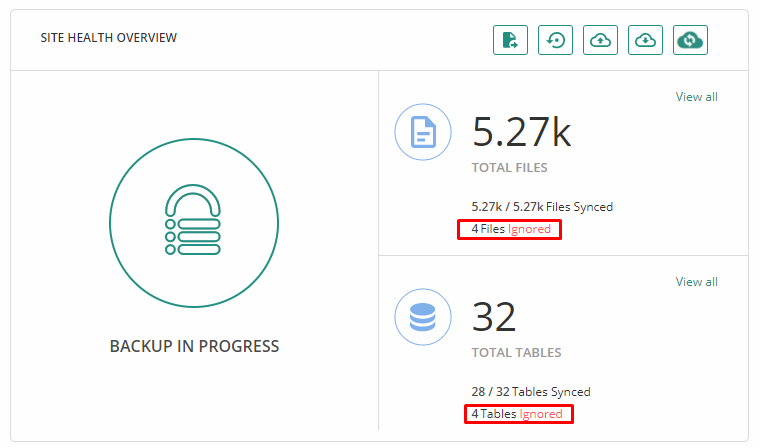
Here, you can choose to include or exclude certain files and database tables from your backups. This is also the place to enable or disable real-time backups if supported by your plan.
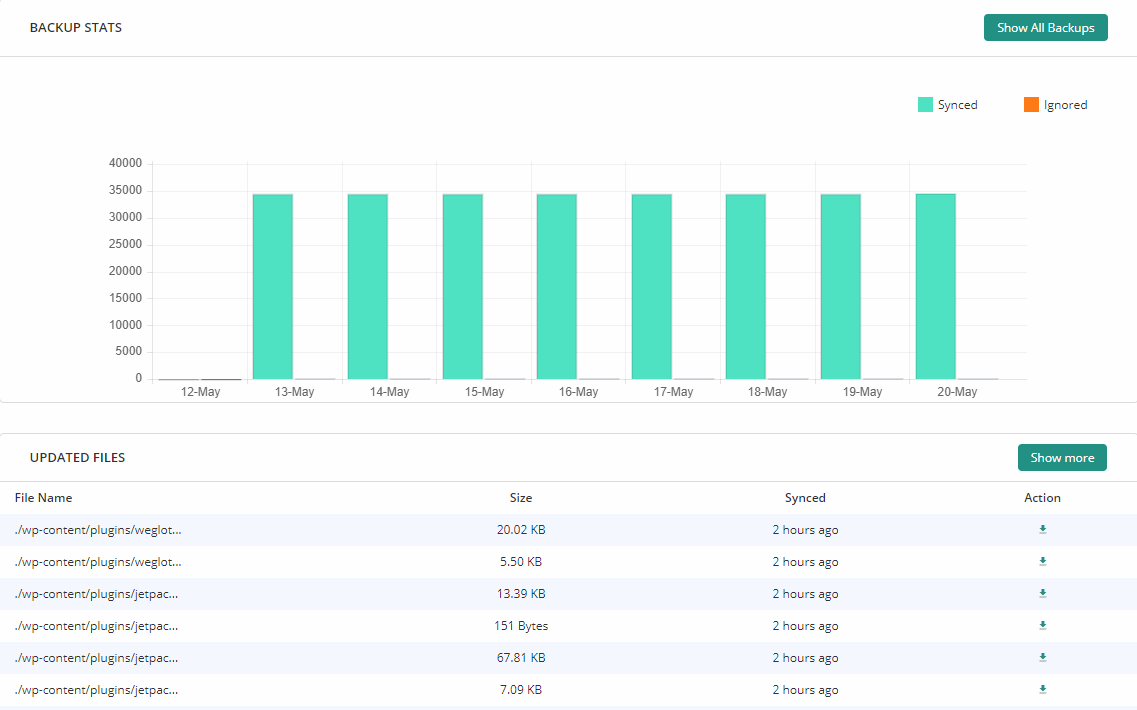
Scrolling down to the bottom of the page reveals an overview of the backup stats, showing you how many files were synced and how many were ignored along with a list of files that changed since the last sync.
You can include files outside of your WordPress installation if you want to by clicking on the red ignored text under the stat for your files backup, same goes for your database backups.
Clicking on the Files Ignored text will bring you to a file browser, as you can see below.
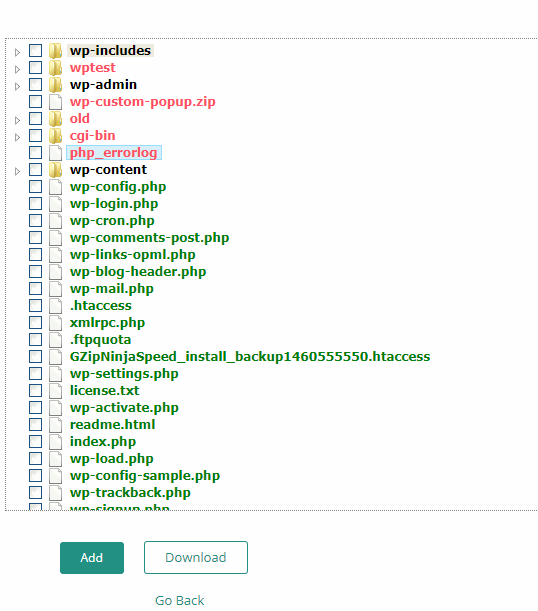
Files and folders in red are the ones not included in the backup. You can include them by checking the box next to them and then clicking the Add button at the bottom. Also, you can directly download any of these files and folders by doing the same, but pressing Download button instead.
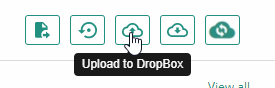
Uploading your Backups to Dropbox
Inside the Backups dashboard, you can access the “Upload to Dropbox” option allowing you to directly upload the latest backup of your site to your Dropbox account.
If you prefer to upload a different backup version, you can click on the number representing how many backups you currently have. This will take you to the list of all backups created for your site. You can choose any of them. Once you’ve found the one you want to upload to your Dropbox account, all you have to do is to click on the Upload to Dropbox link.
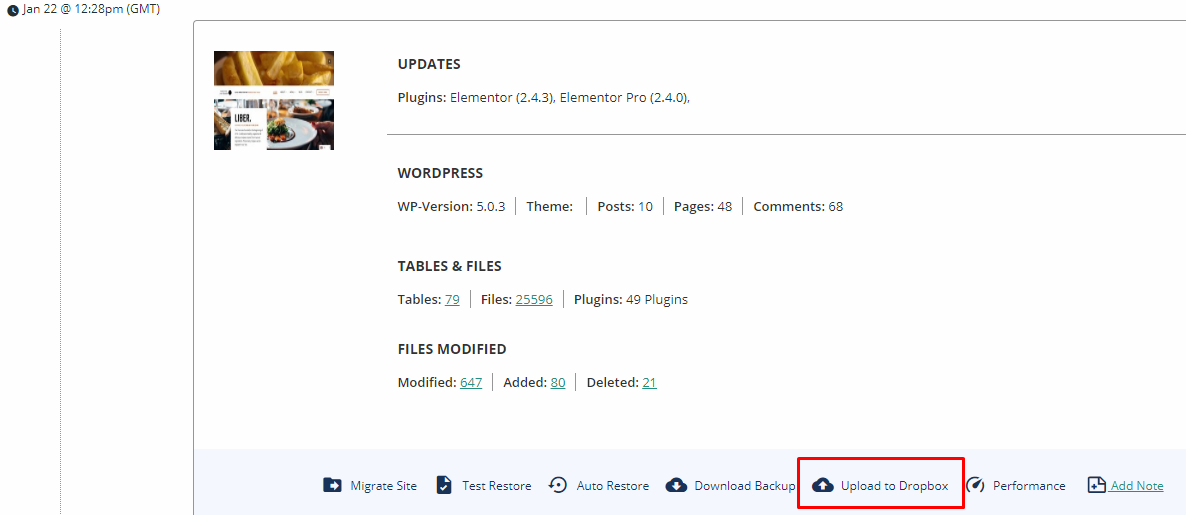
While only Dropbox is the only direct upload supported by BlogVault, you can still use any cloud storage of your choice as additional backup storage. Simply click the Download Backup link which is located beside the Upload to Dropbox link and it will download a zipped backup file of your site which you can store anywhere you want, either on your own hard drive or to another cloud storage platform like Google Drive or Mega.
What to do with Downloaded Backups?
If you downloaded a backup copy of your site or uploaded on to your Dropbox account and you want to restore it, you’d have to do it manually. As of this writing, there is no way to upload a downloaded copy of your site’s backup to BlogVault so it can do the restoration for you.
Downloaded backup files from BlogVault contains the entire copy of your WordPress site along with its database dump (a .sql file). To restore these, you’d have to manually do it yourself.
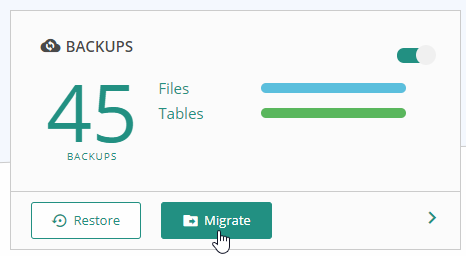
Migrating Your Site
If you want to move your WordPress installation to a new server, click on Migrate either on the site’s dashboard or within the Backups page.
Migrating a WordPress site using BlogVault is painless and easy. All you need is your new site’s FTP credentials and a fresh WordPress installation on it.

Once you enter the correct FTP details of your new website, BlogVault will initiate an FTP session to your new website’s server. You can now view your server’s files just like in a regular FTP client.
In this step, you need to choose the folder where the new WordPress site is installed. In the example below, it’s in the public_html folder of the new server. Yours might be different! Make sure you select the correct folder!
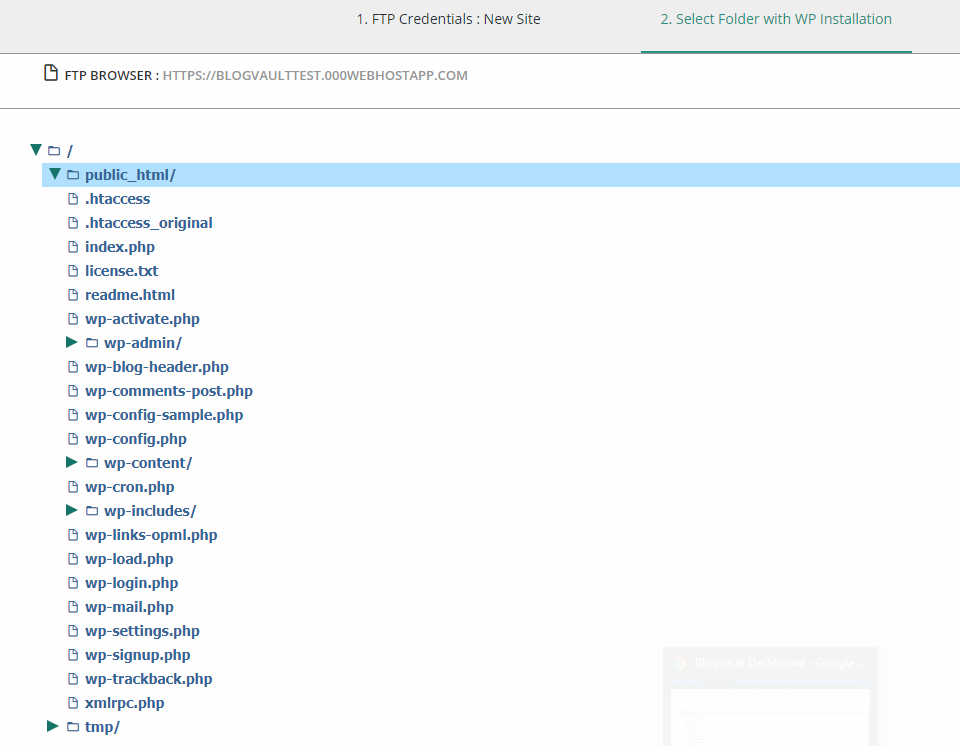
Once you’ve done selecting the correct folder (the highlighted one is where BlogVault will migrate your site), you’ll be taken to the next step of the migration.
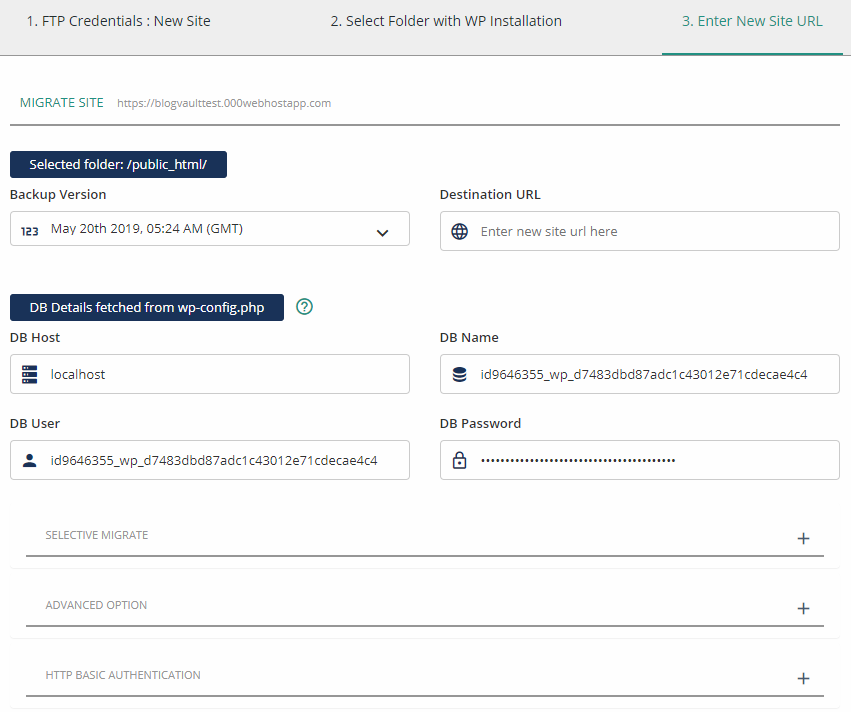
BlogVault will automatically take the new site’s database details from its wp-config.php file (that’s why you need a fresh WordPress installation). If you believe something here is incorrect, now is your chance to fix it.
You’ll choose which backup version you want to use for migration and finally don’t forget to enter your new site’s Destination URL.
Underneath these important settings are additional settings, which, most of the time, you won’t have to touch at all. But, for the sake of completeness, we’re going to go through them really fast. You might also find these helpful if you somehow went into trouble while migrating your site.
- Selective Migrate allows you to choose which files and database tables you want to include or exclude from the migration.
- Advanced Option is where you can input your new location’s name servers and server IP address. This is useful if you just changed your DNS or you haven’t updated your DNS yet.
- There’s also an option to Copy File Permissions of your files and folders to the destination server. By default, all folders and files’ permissions will be set to 755 and 644 respectively. If you edited your file and folder permissions, you’ll want to check this option.
- HTTP Basic Authentication – if your new server is protected by HTTP Basic Auth, you can put your credentials here to avoid any problems.
Once you’ve configured everything, you’re now ready to press the green Continue button at the bottom and the site migration will begin.
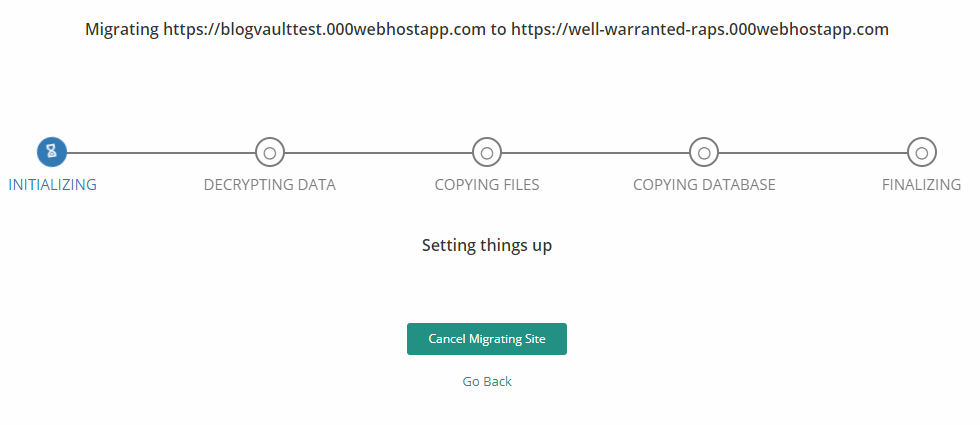
If you’ve noticed above, we’ve done this migration test on a free web host, and, believe it or not, everything went smoothly and perfectly. Everything was correctly migrated and the new URL just works. We’ve wanted to test BlogVault if it truly has a 100% recovery rate and it seems that it’s true!
It took quite some time for the entire process to complete, however, but that is to be expected from a completely free web hosting package. We’ve also tested migrating a test site from one free web host to another free web host and the result is the same: flawless and perfect migration.
You can try it yourself by signing up on any free web host with FTP access and then signing up to BlogVault’s free 7-day trial.
Start a Free Trial Now
Restoring a Backup
Restoring a backup follows pretty much the same steps as migrating your website aside from having to input your new site’s URL or new host credentials.
Basically, you’ll enter your site’s FTP details, choose the folder where your WordPress site is installed and select which backup file you want to use for restoration and wait for it to restore your site.
Testing a Backup
Sometimes a backup gets broken during the backup process and when you restore a broken backup file, you will end up with a broken WordPress site. BlogVault has a Test Restore feature that allows you to preview how your site will look like when after restoring a certain backup file.
You can test a backup file by clicking the number of your backups and selecting which backup you want to test.
Once you’ve found the backup version you want to test, you can initiate the Test Restore by clicking the “Test Restore” function, as shown below.
Clicking on the Test Restore link will initiate a test restoration. Basically what happens is that BlogVault will create a temporary replica of your site in their server using the backup file you chose for testing.
Once the test restoration has finished, you can view the test site and check whether something’s broken or not. You can even log in to its WordPress dashboard, install new plugins and more just like your live site.
The test restore site is HTTP auth protected, you can see your credentials after the test restore is done.
Securing Your Website
Aside from keeping backups of your site, BlogVault also comes with a powerful security feature. From your BlogVault site’s dashboard, clicking on the right arrow in the Security section brings you to the security page which displays your site’s current security status.
It will notify you if there’s any outdated themes or plugins, or if WordPress core needs an update.
Aside from that, it will also display all admin logins from the past 14 days.
There’s also a list of bots that visited your site and BlogVault tells you whether it’s a good or bad bot and whether your site is blacklisted on a particular search engine or not.
Firewalls and Hardening
Directly in the Security page, you can enable or disable the Firewall and Hardening options.
Turning on the firewall is a simple flick of a switch. If you want to see more data related to the firewall, you can do so by selecting the available options in the firewall section located in the site’s dashboard.
You can view traffic logs and whether what was allowed or not by the firewall. You can also check who logged in and logged out of your WordPress site, their IP address, and the time of access and more.
Hardening is an advanced security feature that requires some intermediate tinkering to further lock down your site’s security. If you want to enable it, click on Apply Hardening on the right side of the screen.
Clicking on that brings you to a new page where you can select which hardening features you want to enable. Specifically, you can enable or disable the following settings:
- Block PHP Execution in untrusted folders
- Disable files editor (the one where you can edit your theme and plugin files)
- Block plugin and theme installation
- Change security keys
- Reset all passwords
You’ll need to enter your FTP details for Blogvault to apply any of these security fixes.
Managing Plugins and Themes
From the site’s dashboard, you can access the plugins and themes sections. You can see how many of them are installed, which ones are active and inactive, their current version, etc.
You can directly manage and add themes and plugins to your site through BlogVault’s dashboard. No need to login directly to the WordPress dashboard at all.
The image above shows BlogVault’s plugin manager. You can select a plugin by clicking the checkbox next to it. Once you select at least one plugin, you can access additional options at the bottom of the page, allowing you to activate, deactivate, update or delete the selected plugin(s). This is the same for theme management.
User Management
Like plugins and themes, you can also manage your WordPress users directly from BlogVault.
You’ll be able to see how many users are currently present on your site or multisite network. In case of a multisite network, it shows the total number of all users in your multisite network, but you can only edit and access users of the specific site connected to Blogvault.
Clicking the Manage Users button brings you to a list of all accessible users. You can edit them just like you would inside the WordPress dashboard. You can edit their role, change their password, or remove them from the site.
You can also add new users by pressing that green Add User button at the upper right corner.
Add users by setting a username, email, password, role, first and last name.
Creating, Managing and Merging a Staging Site
A staging site helps you test changes and new features before pushing them to your live site. This will help you avoid possible conflicts and unexpected errors that may result in your website going down.
Creating a staging site is fairly simple. Click on the Add Staging site in the site dashboard and then, you’ll be taken to a screen letting you choose what backup and PHP version to use.
Once you’ve decided on which backup and PHP version to use, your staging site will be created. It will have its own custom URL and it will mimic your website’s appearance, content, and settings based on the backup version you selected. Staging sites will expire after a certain amount of time, but you can extend it by 14 days if you want to by clicking on the Extend button on the site’s dashboard under the Staging section.
The staging site is protected by HTTP Auth. You’ll be provided with a username and password that you can use to access it. Once you’ve logged in via HTTP auth, you then can log in to your staging site using the same WordPress credentials as your live site. You can disable HTTP auth if you want by going to the staging site’s settings.
You can do any change you want in your staging site and view it. It will never affect your live site. Should you want to push changes you made on your staging site to your live site, you can do so by clicking Merge on the site’s dashboard under the Staging section.
Once you do that, BlogVault will initiate a sync and compare the staging site and the live site. It will then display the differences in terms of files and database and lets you choose whether to merge them or not.
After you’ve decided which files and database tables you want to push to your live site, you’ll be prompted to enter your live site’s FTP credentials.
Once you’ve entered the correct FTP credential, you’ll select the folder where your live WordPress site is installed and it will start merging the changes from your staging site to your live site.
Performance, Uptime Monitoring and Report Generation
Finally, BlogVault allows you to view your site’s performance, check its uptime and generate a report about your site’s status for a set period of time.
For performance, you can view your site’s PageSpeed and YSlow score along with detailed information about your site’s performance.
Uptime monitoring displays a beautiful uptime graph showing your website’s uptime status over time.
Finally, the Generate Reports allows you to set a schedule for report generation, generate a new report and view previously generated reports.
When you generate a report, BlogVault creates a PDF file containing stats about your site within a certain time period, which you can configure.
The PDF will contain reports about the site’s traffic, active plugins and themes, what new plugins and themes were installed and which ones were removed, a record of logins, logouts, etc.
Below is a page from a sample report generated by BlogVault report feature.
And there you have it! You’ve seen an exhaustive showcase of what BlogVault has to offer and saw how to use each of its features.
Pros and Cons
Now that you’ve seen the entirety of BlogVault, let’s delve a little deeper into its pros and cons. There’s already a pros and cons section near the beginning of the article but let’s discuss them further here.
Pros
BlogVault is extremely easy to set up. Once you’ve installed the plugin to your site and added it to your BlogVault account, there is literally nothing you need to do if you only want regular backups.
But if you need a little more customization or if you want fine-grained control, then you have tons of options and settings to play with.
In addition to that, its migration feature works seamlessly with any kind of web host and requires very little input from you. All you need to do is to fill up your FTP credentials and select where WordPress is installed and everything will be taken care of for you – no matter if you’re doing restoration or migration, the processes are mostly similar and straightforward.
Cons
One of the possible downsides of BlogVault is it needs your FTP credentials. In addition to that, you’ll need to enter them each time you want to perform an advanced operation. If you don’t have access to FTP, then you can’t use BlogVault on your site. However, most hosting providers offer FTP access even on shared accounts. So, if you’re looking to use BlogVault, you better choose a host that provides FTP access.
Another possible downside of BlogVault is pricing. For a total beginner, it can be quite pricey, even on its lowest tier plan. However, for a booming website, BlogVault’s price is pretty cheap. You’ll probably lose not only hundreds but even thousands of dollars if your thriving site crashes due to an unexpected site misconfiguration or update errors or worse, hacking events. With BlogVault, you have everything you need to keep your site from suddenly disappearing into thin air due to unexpected events.
So, in conclusion, BlogVault’s pros still heavily outweigh its cons by a large margin.
Pricing
BlogVault comes into four different license options, each of them subdivided into three plans. The four license options are Personal, Small Business, Developers and Agency. The difference between four license options is the number of sites that you can add to your BlogVault account.
- Personal – use for 1 site
- Small Business – use for up to 5 sites
- Developers – use for up to 20 sites
- Agency – used for more 20 sites
For each license options, you can choose between Basic, Plus and Advanced. All basic features are available for all plans. They are mostly similar except for the following:
- Basic and Plus plans keep backups for up to 90 days. The advanced plan keeps your backups for 1 year (365 days).
- Basic and Advanced plans’ automatic backups run on a daily basis. Advanced plan, on the other hand, can backup your site in real-time.
- If you want WooCommerce backups, you need Advanced plan. Basic and Plus doesn’t have WooCommerce backup support.
- Plus and Advanced plans comes with advanced security features like malware scanning and removal.
- Only Advanced Plan comes with an Uptime Monitoring feature.
- White labeling is only available on the Developer’s Advanced plan.
Keep in mind that the above list is not exhaustive. For a full comparison, visit BlogVault’s pricing page.
Start a Free Trial Today
Blogvault Coupon
At Collectiveray, we usually partner with such vendors to offer a good discount to our readers, click below to use our built-in Blougvault coupon.
Click here for the lowest price on Blogvault
Testimonials
People love BlogVault. There are tons of reviews online and on YouTube describing how excellent BlogVault is. In addition to that, you’ve seen in this article how flawlessly BlogVault worked even on a free web hosting package – which you can easily replicate for yourself so you can see it with your own eyes.
Anyways, here are what people say about BlogVault, taken from the WordPress repository itself:
I’ve tried ALL the other backup/migration plugins. I’ve spent like 1000$ on those kinds of plugins and 200+ hours of work.
Blogvault is just superior. – alessi0santoro
This platform has proved to be invaluable to me with the constant updates to WordPress and theme frameworks. I’ve tried a few other options for staging and found Blogvault to be the easiest to manage and migrate. Support is always fast and helpful. I highly recommend Blogvault. – michasig
It’s a lifesaver, I couldn’t run my business without it. Site migration is a breeze now and knowing everything is safely backed up and secure means I can sleep at night. Who doesn’t want one less thing to worry about?! – nicolamitchell
You can check them out yourself here.
Alternatives
While BlogVault is currently among the best backup solution for WordPress, there are still other excellent choices out there. Since WordPress means freedom, you’re free to choose from other excellent backup plugins as you wish.
Here are some great alternatives to BlogVault:
- UpdraftPlus – currently the most popular backup plugin for WordPress, thanks to it being free, UpdraftPlus is backed by a knowledgeable team of experts. It has support to on-demand and scheduled backups and allows you to upload directly your backups to a multitude of cloud storage. They also have a staging site called Updraft Clone. It’s free, but there’s a premium version which enables incremental backups, multisite compatibility, backup of non-WP files, and more.
- VaultPress – part of the JetPack plugin and developed by Automattic, the company behind WordPress, VaultPress is another excellent alternative to BlogVault. It offers both daily and real-time backup solution and other features that can be found on BlogVault. You’ll need a JetPack subscription to take advantage of VaultPress, however, and you’ll have to pay per site since there’s no bundles or packages.
- BackupBuddy – they offer a multitude of backup features such as real-time backups, fine-grained scheduling control, and more. Like BlogVault, is also offers site migration and staging sites. Furthermore, it has a tool that allows you to replace your URLs when you migrate a site to a new host as well as a tool to replace a text in your database.
While there are plenty more other backup solutions out there, these three are among the best ones that rival BlogVault in terms of features and pricing.
Final Verdict
BlogVault is probably the best, if not the best backup solution for WordPress. It’s backup, restoration and migration feature is one of the best and easiest to use in the market today and its valuable developer tools, monitoring and site control help you keep your WordPress site up and running at all times, leaving it immune to all major disasters that could occur any time.
Check out BlogVault Now
Please leave a useful comment with your thoughts, then share this on your Facebook group(s) who would find this useful and let’s reap the benefits together. Thank you for sharing and being nice!