
What’s the Internet’s favorite way to find the locations of brick-and-mortar businesses? If you guessed Google Maps, pat yourself on the back. Google Maps is by far and away the most popular location finder online.
Today, if you want your website visitors to drop in and visit you at a physical location, it’s up to you to make their life as easy as possible. Don’t make life hard for them by making them head over to Google Map and type in your address. Not only is putting a ready-made Google map on your site ridiculously simple, but it’s also bound to boost your conversion rate.
Today, I’ll show you how to do that by guiding you through three different WordPress Google maps integration methods for your website.
WordPress Google Maps Integration – The Manual Method
If you’re only looking to include a map on a single page of your site you’ll save time by taking a manual approach.
Let’s head straight to the source: Google Maps.
Once there, type in your address. When you’ve found your business and you’ve got the right location, click the settings icon in the bottom right hand corner. This will bring up a menu. From there, you need to select Share and Embed Map > Embed Map.
Once selected, you’re able to set the map size, with a choice of:
- small (400 x 300)
- medium (600 x 450)
- large (800 x 600)
- and custom dimensions
Don’t worry too much about the zoom level. Once when you embed the map, the zoom levels will reset. Additionally, your users will be able to adjust the zoom level themselves.
When you’re pleased with everything, copy the iframe code provided, head back over to your WordPress site, and paste the code into the appropriate page or post.
Preview the page to make sure everything’s shipshape, publish it, and job done. Yes, it really is that simple to embed Google Maps manually.
WordPress Google Maps Integration – The Plugin Method
The beauty of WordPress is that there’s a plugin for everything to make all our lives that little bit easier. The 19,000-strong database of user-contributed plugins always comes to the rescue when there’s any difficult function that needs tackling.
If you need a map on several pages, or if you’re not good with code and would rather have a plugin take care of map creation and embedding for you, then it’s a good idea to go with a Google Maps plugin, which makes the whole process almost completely hands-off.
My personal choice is MapPress. Having accumulated over 100,000 active installs so far, it seems like the vast majority of WordPress users agree with me.
The plugin is completely free and can be found by clicking Plugins > Add New in your WordPress Dashboard, then searching for MapPress Easy Google Maps.
Once you’ve found it, be sure to download, install, and activate the plugin. If done correctly, you’ll now be able to see a MapPress settings page link in the side menu. You don’t need to go to this tab, however — all maps can be created and embedded right from the post/page editing screen.
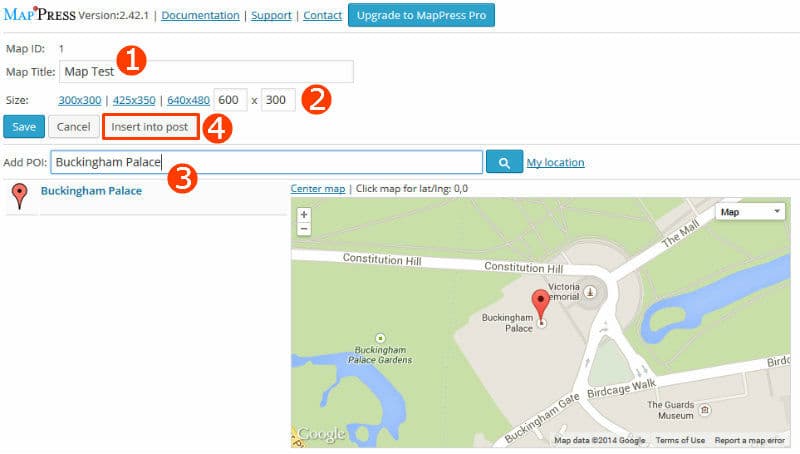
To illustrate how the plugin works, click to create a new post. When you’ve done this, scroll down below the text editor and you should find a brand new meta box, titled MapPress. Click on the arrow to open up the full meta box then select New Map.
You’ll be presented with quite a few options (you can even take a look at a map of our planet as a whole … but that won’t be too helpful for visitors).
Give your map a title, then choose your dimensions. You’re presented with the same three different predefined sizes, but personally, I recommend customizing the dimensions to fit well with your content area and website design.
Next, you have to get the map to display your desired location. You have two ways to do this: by searching for the right location with the address, or just hitting the My Location and letting the plugin find out where on the planet your computer is.
Once you’ve done this you should see a preview version of your map, complete with the little red place marker. If everything’s well and good, click to insert the map into your post.
The plugin will automatically assign your map with an ID number and shortcode. As this is your first map, you should now see the shortcode [mappress mapid=”1?] in the text editor. If you want to insert the same map on a different page, remember the shortcode and you won’t need to go through the process of creating a new map each time.
To check everything is working properly, let’s preview our post and view our map in all its glory.
That’s it! You now know how to embed a Google map on a post or page.
WordPress Google Maps Integration – The Widget Method
Now, some of you won’t just want your map on a single page, you’ll want it visible on every page. The easiest way to do this is to put your map in a widget, either in the sidebar, header, or footer.
The one drawback with MapPress (and most other map plugins) is that it doesn’t facilitate this, so we’re going to need a new plugin.
My recommendation is the Google Maps Widget — find it, install it, and activate it in the same way you did with MapPress.
Now, click Appearance > Widgets in the sidebar to navigate to your sidebar and footer editing screen. To place a map in a sidebar, you’re going to need to drag the Google Map Widget into the appropriate widgetized area for where you want your map to be. To demonstrate, I’ve put my widget in the right-hand sidebar on my home page.
Tired of WordPress hosting support that seems to know less than you do?
We understand! That’s why Kinsta only employs high-skilled developers and Linux Engineers. The expertise of our support department is second to none, and we’re available 24×7 to help!
When you’ve done this, open up the drop-down menu for your options. Click on Thumbnail Map, give your map a name, set your location, and then play around with some of the options to customize your map’s appearance. You can set the map size, pin colour, pin size, level of zoom, and the text that appears above and below your map.
The settings in the Thumbnail Map will determine what your visitors will see in the sidebar. In the Link To drop-down, you’ll be asked where you want your visitors to be sent if they click on your map (you could send them to your contact page, for example). One of your options is a Lightbox Map which will display a larger, more prominent version of your map in a lightbox. If you choose this setting, you can configure this map’s appearance under the Lightbox Map setting.
Click the Save button in the bottom right of the widget box to save your widget settings.
To see your brand new map widget, refresh your website, and take a look.
And there you have it. You should be able to easily insert a Google Map into your website manually or with a plugin, in a page/post or in a widgetized sidebar.
If you have any difficulties or questions (or tips!) about the WordPress Google maps integrations, feel free to use the comment section below.

![15+ Top Black Friday & Cyber Monday Deals for Developers and Designers [2023]](http://wiredgorilla.com/wp-content/uploads/2023/11/15-top-black-friday-cyber-monday-deals-for-developers-and-designers-2023.jpg)